Monday, January 30, 2012

Zuppa Toscana

This is another great find on pinterest.  It is described as better than Olive Garden Zuppa Toscana!
All I can say is soup is really really good this time of year and this soup was definitely really really good!
I will make a few changes next time I make it, and there will be a next time!
I will use less sausage.  We like to have more soup than sausage.  If you like lots of sausage, leave it the same. 
This is definitely a soup to add to my cold weather list! 
Zuppa Toscana
(found on pinterest via
  • 4 slices bacon, diced
  • 1 lb hot (I used mild) Italian Sausage (I will do 1/2 lb next time)
  • 1 large yellow onion, diced
  • 4 cloves garlic, minced
  • 4 cups (32 oz) chicken stock
  • 3 cups potatoes, cubed
  • 3/4 tsp salt
  • 1/4 tsp pepper
  • 2 cups kale, in bite size pieces (didn't have this, added shredded zucchini instead)
  • 1 cup heavy cream (used just whipping cream)
  • Parmesan cheese, grated
  • kids liked saltines too!
In a large pot, cook the bacon until crispy.  I like to use my kitchen scissors and cut the bacon before I cook it!  That way it is already diced.  Drain your bacon grease.  Add your sausage, breaking it apart as it cooks.  Once sausage is browned and crumbled, drain off the grease leaving a little to saute the onions in.  I put the sausage and bacon aside on a plate.

Cook the onion in the remaining small amount of grease.  Saute until translucent; add the minced garlic and saute a little longer.

Stir in your potatoes, sausage/bacon, and chicken stock (or I used bouillon).  Season with salt and pepper and simmer for about 20 minutes or until potatoes are tender.

Add your kale (or zucchini) and cream.  Bring to a simmer.  Top each bowl with Parmesan cheese!

Thursday, January 26, 2012

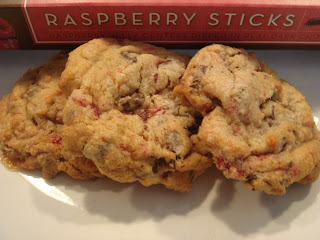
Cherry (or Raspberry) Chocolate Chunk and Marshmallow Cookies

Wow that title was a mouth full!!
I found this recipe on Picky Palate!  She originally used Cherry Sticks, but I was given Raspberry sticks at Christmas.  I thought, why not give this a try!  Picky Palate always has great recipes and I was up for the experiment.
The experiment was successful and they turned out really good!  I don't think I would go out and buy these sticks on purpose to make them all the time, but the raspberry and chocolate was really yummy together!

Cherry (or Raspberry) Chocolate Chunk and Marshmallow Cookies
  • 1 cup softened butter
  • 3/4 cup sugar
  • 3/4 cup packed brown sugar
  • 2 eggs
  • 1 tbsp vanilla extract
  • 3 cups flour
  • 1 tsp baking soda
  • 3/4 tsp salt
  • 30-40 cherry, raspberry sticks, chopped (one pkg)
  • 2 cups chocolate chunks or chips
  • 80 mini marshmallows
Preheat oven to 350 degrees.  Line a baking sheet with parchment paper or a silpat liner.

Place butter and sugars in your mixer and mix until light and fluffy, about 2 minutes.  Add eggs and vanilla, beating until well combined.

Slowly add your dry ingredients and mix well.  Add your chopped sticks, chocolate chunks and marshmallows.  Mix just until combined.

Place on your cookie sheet using a medium cookie scoop about 1 inch apart.  Bake for 9-12 minutes, or until lightly browned. 

As soon as the cookies come out of your oven, use a plastic knife to push the melted marshmallow back onto your cookie.  Let cool for 10 minutes and then place on your cooling rack!

Enjoy!

Wednesday, January 25, 2012

CTR Pretzels

The boys and I made these a couple weeks ago after church.  They were fun to make with the kids!  They each picked a letter and then we all helped with the other one!
It was a fun afternoon cooking with the boys and they turned out really good!  We dipped them in nacho cheese and ate them warm too!
CTR Pretzels
(January Friend magazine)
  • 1 tsp salt
  • 2 1/2-3 cups flour (I did half wheat flour)
  • 1 tbsp yeast
  • 1 cup warm water
  • 1 tbsp sugar
  • melted butter
  • coarse salt to sprinkle on top
Mix salt, flour yeast, warm water and sugar together until they form a ball.  Then continue to knead dough until smooth and elastic~I did this all in my mixer.  Cover with a clean towel and let rise in a warm place for 1 hour.

Pull off sections of the dough and let the kids roll into long ropes.  Form the ropes into the letters "CTR" or you can do your kids initials or whatever you like!

Put the pretzels on a greased cookie sheet and bake for 8-10 minutes at 450 degrees.  It might take a little longer to make them golden brown!

Brush pretzels with melted butter and sprinkle with coarse salt!  Enjoy like this or dip in nacho cheese!

Tuesday, January 17, 2012

Multigrain Bread

I have made a resolution this year to try and make homemade bread more often.  I am trying to make it once a week~so far I have done that!
I am also using more wheat in my breads, going for the healthier resolution too!  I have found a couple breads that have been really really good!  They have been moist, easy and really delicious!
I found this recipe on ourbestbites, but originally found in the Cook's Illustrated Cookbook.  Try it out and you won't be disappointed!

Multigrain Bread
  • 1 1/4 cup seven-grain hot cereal mix (I used a 6-grain mix from Alison's pantry that worked out great, but I am going to look for the 7-grain to try next time)
  • 2 1/2 cups boiling water
  • 3 cups all-purpose (not bread) flour
  • 1 1/2 cups whole wheat flour
  • 1/4 cup honey
  • 4 tbsp butter, melted and cooled
  • 2 1/2 tsp yeast
  • 1 tbsp salt
  • 1/2 cup oats (for topping)
Place 7-grain mix (or 6-grain) in your mixer and pour the boiling water on top.  Let this mixture stand for about 1 hour.  Stir occasionally.  The mixture should resemble thick porridge.  The 6-grain mix wasn't porridge, but really moist.

Now add honey, butter, and yeast and mix on low speed until combined.  Add both flours about 1/2 cup at a time.  Knead bread with your mixer until a cohesive mass starts to form, 1 1/2-2 minutes.  Cover bowl tightly with plastic wrap and let dough rest for 20 minutes.

Add salt now and then mix in your mixer until dough clears side of bowl, about 3-4 minutes.  (I didn't read this and ended up adding the salt with the flours and didn't do this step).  Once bread dough clears sides of bowl, knead for 5 more minutes.

Place dough in a greased bowl and cover tightly with plastic wrap and let rise at room temp until doubled in size ~ 45-60 minutes. 

Grease two bread pans.  Put your dough on a floured surface and divide into 2 balls.  Shape your dough into loaf shape, repeat with second ball also.  Spray loaves lightly with water or vegetable oil spray.  Roll each loaf in the oats to coat evenly and then place into your loaf pans.  Cover loosely with greased plastic wrap and let rise until doubled in size (about 30-40 minutes).

Preheat oven to 375 degrees.  Bake for 35-40 minutes or until golden brown.  Place pans on wire rack and let rest for 5 minutes and then remove loaves from pans and let cool!

Monday, January 16, 2012

Cheddar and Herb Biscuits

This was found on www.forkinit.blogspot.com with the crock pot barbecue chicken.  She said you needed to eat these with the chicken.
I took her idea and made these too!  They were really good and moist and went great with the chicken.  They would go great with lots of meals too!
They were a simple bread add on, with ingredients I had on hand too!
Cheddar and Herb Biscuits

Biscuits:
  • 2 cups flour
  • 1 tbsp baking powder
  • 1/4 tsp garlic powder
  • 1/2 tsp salt
  • 2 tbsp shortening
  • 3 tbsp butter, cold
  • 1 cup buttermilk
  • 1 1/4 cups grated cheddar cheese
Buttery Topping:
  • 3 tbsp melted butter
  • 1/4 tsp dried parsley flakes~optional
  • 3/4 tsp garlic powder
  • pinch of salt
Preheat oven to 425 degrees.

In a medium bowl, combine flour, baking powder, garlic powder and salt.  Cut in shortening and butter until coarse crumbs are formed.  Lightly mix in grated cheese.

Mix in buttermilk (if you don't have buttermilk, sour your milk by taking 1 cup milk and add 1 1/2 tsp vinegar-let sit together until little bubbles appear on the top, about 10 minutes).  Mix together just until moist, don't over mix or they will be tough.

Drop the biscuits onto a greased cookie sheet.  It was recommended to use your larger cookie scoop, which I did and it worked great.  Bake for 12-14 minutes, or until browned and golden.

While they are baking, make your buttery topping.  Mix the spices into your melted butter.  As soon as the biscuits are out of the oven, brush the butter/herb mixture on the hot biscuits and then enjoy warm!

Friday, January 13, 2012

Crock Pot Barbecue Chicken

I found this recipe idea on Pinterest.  Yes pinterest again, but it is a great site with lots of people sharing their great finds!
The best part about this chicken is that it was cooked in the crock pot.  I love a meal that is done earlier in the afternoon, especially when you have kid activities in the after school.
Try this and you wont be disappointed!
Crock pot Barbecue Chicken
(found on pinterest via http://www.forkinit.blogspot.com/)
  • 4-6 pieces chicken breasts (can even use frozen ones)
  • 1 bottle BBQ sauce (she used sweet baby rays, I used what I had on hand)
  • 1/4 cup vinegar
  • 1 tsp red pepper flakes
  • 1/4 cup brown sugar
  • 1/2-1 tsp garlic powder
Mix BBQ sauce with vinegar, red pepper flakes, brown sugar and garlic powder.  Place chicken in your crock pot (I try to spray with non-stick spray every time to make for easier clean up).  Pour the sauce over the top and cook on LOW for 4-6 hours.

We ate this with baked potatoes, broccoli and Cheddar and Herb biscuits~a recipe I will share!

Thursday, January 12, 2012

Egg in the Hole

I don't know what the true name of this breakfast idea, but we called it Egg in the Hole.
We had rave reviews at our house this morning and even had asking for seconds!  Super easy breakfast idea, one that I have had before but haven't thought about for a long time!  Just another idea if you find yourself in a breakfast rut!
Egg in the Hole
  • Bread (we used sourdough-YUM)
  • Eggs
  • Butter
Get a piece of bread and find a biscuit cutter or we used a drinking glass to make your center hole.  We toasted the center hole and had it as toast.

Butter your pan and place your bread in the pan.  Next, crack your egg in the center of your bread and make sure it fills the center.  Butter the top side of your bread.

When egg cooked, flip over and cook other side.  When done, serve with your circle toast!

Monday, January 9, 2012

Snowman Donuts

I found another great idea on Pinterest and made them for Zach's birthday.  We brought them to his class for his birthday treat and they were a hit!  Zach loves powdered donuts, so how could I go wrong!
I did simplify them a little, but like how they turned out.  You can definitely add more decorations if you want!
Snowman Donuts
(idea found on Pinterest)
  • Powdered Donuts
  • mini chocolate chips for the eyes and mouth
  • M&M's for mouth, or you could use Mike-n-Ikes, or whatever you like
  • Hershey kisses for the hat
  • shish kabob skewers
  • Pull apart licorice for the scarf (which I didn't do this time)
Slide 3 donuts on your skewer.  Be careful here, I did break apart a few donuts.  This is the main reason I didn't add buttons on the body, I was afraid of the cracking.

Turn your Hershey kiss around on the skewer top to secure it in place.  Now decorate your snowman however you like or have your kids help.

The ones I saw were wrapped individually in bags with a ribbon tied around the skewer.  I was mass producing for a class, so no bags for me!

They were super cute and easy for a winter time treat!

Friday, January 6, 2012

Thumbprint Cookies

Yes again another fun find on Pinterest.  I kind of ran with the idea and thought this is not only fun for Christmas, but you could modify it for any holiday.  Just red sprinkles for Valentines with a chocolate Hershey kiss, green for St. Patty's day and so forth!  You could probably even make these into little nests for Easter and put the little chocolate eggs in the middle!  We enjoyed these for Christmas with candy cane Hershey kisses in the center!
Thumbprint cookies
(modified from Better Homes red and white cookbook)
  • 2/3 cup butter or margarine
  • 1/2 cup sugar
  • 2 egg yolks
  • 1 tsp vanilla
  • 1 1/2 cups flour
  • sprinkles of your choosing
  • Hershey kisses of your choosing
In your mixer, beat your butter or margarine on high speed for about 30 seconds.  Basically you want all the chunks gone!  Then add your sugar and beat until combined, scraping the sides as needed.  Beat in egg yolks and vanilla.

Add you flour and combine.  The recipe says to chill for 1 hour, but I usually test the dough and if I can handle it I start right away, if not put in the refrigerator for 10-20 minutes and test it again.

Shape dough into 1 inch balls.  Roll your dough in your sprinkles.  Then place on your cookie sheets about 1 inch apart.  Continue doing this until you have filled your cookie sheet.  Now take your thumb and make an indent into your cookies.  Basically you are putting your thumb print into your cookie ball and flattening it a little.

Bake at 375 degrees for 10-12 minutes or until edges are lightly browning.  While your cookies are cooking, start unwrapping your Hershey kisses.  Once they come out of the oven, start placing the kisses in your thumb print.  Once all the kisses are in your cookies, place them on a cooling rack and let them cool.  If you don't let cool, your Hershey kisses will get smooshed because they get melty from the heat of your cookie!

Enjoy these yummy treats for any holiday!

Thursday, January 5, 2012

Spicy Thai Noodles

This was another find on pinterest.  I made this and even made the less spicy version and about burned up my kids chapped lips!  It has great flavor, but was very spicy.  I am planning on  adjusting the red pepper.  The noodles were way less spicy the next day and my kids even said they were better.  The first night I made them they didn't want to stop eating them, but their little mouths were on fire!  So try with my adjustments and see what you think.
Spicy Thai Noodles
  • 1 box linguine or angel hair pasta
  • 1-2 tbsp crushed red pepper (even 1 tbsp was too spicy, going to try 1/2 tbsp)
  • 1/4 cup vegetable oil
  • 1/2 cup sesame oil
  • 6 tbsp honey
  • 6 tbsp soy sauce
  • any additional add ins you like, chicken, peas, sprouts, peanuts, green onions, etc.
Boil Noodles and drain.

Have all your add ins you want ready to go!

Heat the vegetable and sesame oils and crushed red pepper over medium heat in a small pan.  Heat til very warm and then strain the red peppers out and reserve the oil.

Add to the oil the honey and soy sauce.  Whisk together.  Toss mixture with noodles and any add ins you wanted.

Serve and enjoy!

Wednesday, January 4, 2012

Creamy Crockpot Hot Cocoa

YUM, YUMMY, YUMMIRIFIC!!
I had this first at a friends house and then had to make it on my own.  Rich, creamy and oh so delicious.
I did make a few adjustments to make it a little healthier!  I thought it was still just as good and maybe not so heavy with the adjustments.  I will give both recipes and you can decide!!
_____________________________
Creamy Crock pot Hot Cocoa
(found on pinterest from MrsHappyHomemaker.com)

  • 1 1/2 cups heavy cream (I only did 3/4 cups)
  • 1 can sweetened condensed milk (14 oz)
  • 2 cups milk chocolate chips
  • 6 cups milk (I added another 3/4 cups)
  • 1 tsp vanilla extract
Stir all ingredients together in your crock pot.  I basically halved the cream and then added more milk to make up the difference.  I will definitely do this all the time!

Cover and cook on low for 2 hours ~ coming back to whisk occasionally.  Garnish with marshmallows or whipped cream if desired. 

Enjoy on these cold winter days!  Great to start and have ready when kids get home!