Tuesday, July 31, 2012

Almond Joy Brownies

I have many recipes waiting for me to post!  I don't know why I have no motivation, maybe its the heat?  Maybe its the summertime business we all seem to be experiencing??
Maybe I am just plain lazy??
Whatever it may be, I am still cooking, just not blogging!
This recipe was a hit and yummy!
Chocolate, Almonds, Coconut!!!  Who couldn't ask for a better combination!  I didn't do the Chocolate topping but served them with hot fudge and ice cream on the side.  I don't think it needs the topping, but I will include the option for you to try!
Almond Joy Brownies
(Beantown Baker)
For the Brownie:
  • 1/2 cup butter
  • 1 cup + 2 tbsp sugar
  • 1/2 cup + 2 tbsp cocoa
  • 1/2 tsp salt
  • 1/2 tsp baking powder
  • 1/2 Tbsp vanilla
  • 2 eggs
  • 3/4 cup flour
  • 1 cup chocolate chips
  • 2 cups shredded, sweetened coconut
  • pinch salt
  • 2/3 cup + 2 tbsp sweetened condensed milk
  • 1 cup whole almonds, chopped
Chocolate Topping:
  • 3 oz bittersweet chocolate, chopped (or 1/2 cup bittersweet chocolate chips)
  • 2 oz semisweet chocolate, chopped (or 1/3 cup semi-sweet chocolate chips)
Instructions:

Preheat oven to 350 degrees and lightly grease an 8 x 8 pan.

In a saucepan over low heat, melt your butter.  Then add your sugar and stir to combine.  Heat until hot but not bubbly.  It will become shiny looking as you stir it.  This helps dissolve the sugar and give the brownie a shiny crust.

Transfer your sugar/butter mixture to a mixing bowl.  Stir in the cocoa, salt, baking powder, and vanilla.

Whisk in the eggs, stirring until smooth.

Add your flour and chocolate chips.  Stir until smooth.

Spoon your batter into your prepared pan.

Next, combine your coconut, salt and sweetened condensed milk.  Stir to combine.  Drop your coconut mixture onto your brownie batter.  Drop evenly all over and then take a knife and swirl it into your brownie batter.

Sprinkle your chopped almonds on top and bake for about 30 minutes.  A cake tested should come out clean when done.  You may have a few moist crumbs, which is fine.  Remove from oven and cool.

~For the chocolate topping, melt your chocolate until completely melted in your microwave in 20 seconed intervals or on the stove in a double boiler.  Spread melted chocolate on top of the brownie.  Your brownies can be warm or completley cooled.  Refrigerate overnight and enjoy!

I omitted the chocolate topping and we ate the brownies the same day and served with hot fudge and ice cream which was super good too and omitted the waiting period! 

Monday, July 2, 2012

Honey-Lime Chicken Skewers

I didn't get a picture of these, but they were super yummy and a great marinade!

Honey-Lime Chicken Skewers
  • 3 tbsp soy sauce
  • 2 tbsp honey
  • 1 tbsp oil
  • juice of one lime
  • 2 garlic cloves, minced
  • 1-2 tsp Siracha, or I used a honey garlic one
  • red pepper flakes, to taste
  • 2 tbsp cilantro
  • 1 lb skinless, boneless chicken breasts
In a small bowl, combine your ingredients, through the cilantro.  I didn't use the cilantro because my husband doesn't like it.  Mix thoroughly.

Pour the marinade over cubed chicken breasts and turn to coat.  Cover and allow to marinate for at least 1 hour.

Put on your skewers and then grill on medium high heat for 6-8 minutes per side.  Make sure juices run clear and enjoy!

Friday, June 29, 2012

Strawberry Sherbet

The Dad at our house got an ice cream/sherbet/sorbet/yogurt maker for fathers day! 
We finally tried it and made this Strawberry Sherbet.  It was yummy, cool, refreshing on these hot summer days and it had 4 ingredients!
I love this ice-cream maker and I am starting to feel guilty like I gave him a present I wanted!  But I keep telling myself it is benefiting him too!
Strawberry Sherbet
  • 2 cups hulled strawberries (I think we could have added more strawberries too!  Love the strawberry flavor!)
  • 2 cups low fat milk
  • 2 tsp lemon juice
  • 1/2 cup sugar
Place strawberries in a food processor or blender and puree until smooth.  If you don't want the seeds you can pour this mixture through a strainer and get some out!

Stir in the milk, lemon juice, and sugar.  Refrigerate for at least 2 hours or overnight.  Make sure your mixture is thoroughly chilled.

Pour the chilled mixture into your ice-cream maker bowl and follow your recommended instructions for freezing and enjoy an awesome summer treat!

Thursday, June 28, 2012

Oriental Chicken Salad and Dressing

Oh my goodness!  Yum! 
Can I have this at least once a week!?  Or everyday?
This was sooooo good and everyone devoured theres!  It was such a good summer meal, especially since it is soo easy to prepare!
A great easy salad that had great flavor too!
Oriental Chicken Salad and Dressing
  • Romaine lettuce, chopped
  • Mandarin Oranges
  • Cooked, seasoned and sliced chicken (used Montreal Steak Seasoning for Chicken to season mine)
  • Sliced Almonds
  • Chow Mein Noodles
Dressing
  • 1/4 cup mayonaise
  • 4 tbsp rice wine vinegar
  • 2 tbsp sugar
  • 2 tbsp sesame seed oil
  • 1 tsp dijon mustard
Get all your ingredients prepared and ready.  I opened 2 cans of oranges and just made enough chicken for my family with a little left over.  You can adjust this to as many or as little people as you need to feed.

Keep your ingredients separated so that you can have leftovers another day.  I put my sliced chicken in one bowl, then the oranges in another and so forth.  You then start with placing your lettuce in your bowl or on your plate.  Top with your oranges, chicken and then top with your almonds and chow mein noodles.  Now you are ready for your dressing.

Combine all your dressing ingredients and whisk until smooth and blended.  Pour over your individual salads and enjoy! 

Todd took this to work and I separated it into small containers with the lettuce in the biggest and then he put it together and it was a great leftover lunch!

Wednesday, June 27, 2012

Pioneer Womans Cinnamon Rolls

I have a favorite cinnamon roll recipe.  It was one I got from a friend when I first got married and have loved it ever since.
I was in the mood to try something new and since I have practically loved every recipe from Pioneer Woman, I decided to try hers!
They were yummy and just as good as her pictures showed!  She uses a maple frosting that is fun to try every once in a while too!
So if you are in the mood for cinnamon rolls (well maybe not this week with 100 degree temps) give these a try or maybe just try her frosting with your own favorite recipe!
I also highly recommend both her cookbooks!  They are awesome!
Cinnamon Rolls
(Pioneer Woman cookbook Recipes from an Accidental Country Girl)

Dough
  • 1 quart (4 cups) whole milk (I just use what I have, but I am sure whole milk would make them a WHOLE lot yummier!!)
  • 1 cup oil
  • 1 cup sugar
  • 2 pkgs (4 1/2 tsp) active dry yeast
  • 9 cups flour (I used half wheat and half white)
  • 1 heaping tsp baking powder
  • 1 scant tsp baking soda
  • 1 tbsp salt
Filling
  • 2 cups melted butter
  • 1/4 cup ground cinnamon
  • 2 cups sugar, plus more as needed
Maple Icing
  • 2 lbs powdered sugar
  • 1/2 cup whole milk (or whatever you have on hand)
  • 6 tbsp melted butter
  • 1/4 cup strongly brewed coffee (I just used more milk here!)
  • Dash of salt
  • 1 tbsp maple flavoring or maple extract
For the dough, heat your milk, oil, and sugar.  Do over medium heat and warm it up but don't let it boil.  Set it aside and let cool to lukewarm.

Once it is lukewarm, sprinkle your yeast on top and let it sit for 1 minute or until you start seeing it working.

Now pour this mixture into your mixer and get ready to mix!  Add 8 cups of your flour and stir until combined.  Cover with a clean towel and set it aside to rise for about 1 hour.  Make sure you have a warm spot or if you are lucky enough to have a proofer on your oven, stick this pot of yumminess inside there!

Remove your towel after an hour and you should see a yummy rised dough.  Now add your baking powder, baking soda, salt and the remaining 1 cup of flour.  Mix with your dough hook again and combine.  If you need to add more flour to make it not incredibly sticky, do so!

Now the joy of this recipe is that she says you don't have to use it right away!  I haven't tried this with hers, but she says you can put the dough in the refrigerator for up to 3 days and just keep punching the dough down if it rises up over the bowl!

If you are using the dough right away (or you are ready to use it from the refrigerator), take half your dough and roll it out to a large rectangle.  You may want to flour your work surface to prevent sticking!  Now comes the yummy goodness!  I gave her measurements for butter, cinnamon and sugar.  You can use her measurements and use half for this part of the dough and half for the other part or you can wing it like I do and just sprinkle till it looks good!  The most important part is to make sure you do the melted butter first!  Make sure you try and spread evenly and don't get too close to the edges so you can roll them up and not loose too much buttery yumminess!

Begin at the long end and start rolling the dough up.  Try and keep it tight!  When you reach the end, pinch your seams together.  Now use a knife and cut your rolls into 1 1/2 inch slices.  (You can see a great step by step on her blog if I have confused you by now!)

Pour a couple tablespoons in your pan (she uses pie pans, or I like jelly roll pans or whateve you want to cook them in) and make sure the butter coats the pan.  Place your cut rolls in your pan making sure you don't overcrowd your rolls.  Repeat this until you are out of dough and then do the same with your other half of dough.

Cover your rolls with a clean towel and let rise for about 20 minutes.  During this time, preheat your oven to 375 degrees.  You can now get a head start on your dishes, or take a much needed break!

Now remove your towels and bake for 13-17 minutes or until golden brown.  Don't overly brown them, you will be sad if you do!

While they are baking, make your icing!

In a large bowl, whisk together your powdered sugar, milk, butter, coffee(or more milk), and salt.  Add your maple flavoring.  Whisk until smooth.  Taste and add more maple, sugar, or butter if you feel it needs anything else!  The icing should be thick but pourable!

While the rolls are still warm, pour your maple icing all over the top, making sure to get all the edges covered.  As they sit the rolls will absorb the icing and make them super yummy!

Thursday, June 14, 2012

Shredded Tex-Mex Crock-Pot Chicken

I love a good crock-pot meal!  I have instituted another meal day!
We do Breakfast Wednesdays and now I am doing Crock-Pot Tuesdays!
It is nice to have my meal almost put together in the morning and then we can play longer in the afternoons!  This will really come in handy when the town pool opens!
This chicken had really great flavor and we loved it in burritos and nachos.
Try this easy dinner on one of these hot summer days coming up!
Shredded Tex-Mex Crock-Pot Chicken

  • 4 chicken breasts (mine were even frozen and it turned out great)
  • 1 1/4 tsp cumin
  • 1 tbsp chili powder
  • 1/2 tsp coriander
  • 1/4 tsp paprika
  • 1 1/2 tsp salt
  • 1/2 tsp pepper
  • 1/3 cup chicken broth (I just used water!)
  • 1/3 cup (packed) cilantro leaves, chopped (didn't add since someone at my house HATES cilantro)
  • 2 limes, juiced
  • 1 large onion chopped (not finely though)
  • 1 jalapeno, seeded and minced (I just sliced mine)
  • 4 garlic cloves, minced
  • 1 tbsp olive oil
Heat your oil in a medium sized pan.  Add your chopped onion and saute for 5 minutes.  Add your cumin, chili powder, coriander, paprika and garlic.  Saute for another 2 minutes.

Now add your chicken broth or water to deglaze the pan.  Basically you are trying not to leave behind any flavor and getting all those brown bits off the bottom of the pan!  Turn your heat off and set aside!

Sprinkle the chicken with the salt and pepper.  Add to crock pot and then squeeze your lime juice on top.  Add your cilantro, jalapeno, and pour your onion-garlic mixture over top!

Cook on low for 3-5 hours.  Remove when done and shred your chicken.  You can now add your onion mixture to your chicken or I left it out and it still had tons of flavor.

Now it is up to you to eat it up!  Serve as soft tacos with shredded lettuce, avocado, tomato, cheese, sour cream, refried beans, salsa or whatever your heart desires!

Wednesday, June 13, 2012

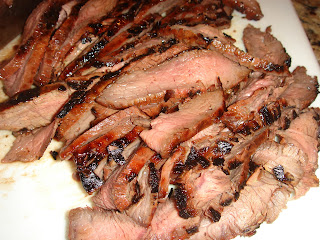
Asian Inspired Flat Iron Steak

We are carnivores at our house and nothing seems to be better than a good cooked steak!  (or one that is Todd endorsed!!)
Well I also love a meal where part of it involves cooking outside by my husband!  Nothing better than having a little help with dinner!
This steak had great flavor and was really tender!  My husband usually prefers meat flavor instead of marinade, but even he liked this a lot!
We ate it with rice and it was loved by all!
Asian Inspired Flat Iron Steak
(From Pioneer Woman Black heels to Tractor Wheels book)
  • 1/2 cup soy sauce
  • 1/2 cup sherry (or 1/4 cup vinegar, 1 tbsp sugar & then add water to make 1/2 cup of mixture for a substitute)
  • 1/4 cup honey
  • 2 tbsp sesame oil
  • 2 heaping tbsp minced ginger (or I used powder)
  • 2 tbsp (3-5 cloves) minced garlic
  • 1 tsp crushed red pepper flakes
  • 2 flat iron steaks
  • Can garnish with roasted sesame seeds and slivered green onions
Whisk all the ingredients, except steaks! :)

Place the steaks and marinade in a Ziploc bag and chill in the refrigerator for 3-6 hours.  Then grill them to your preferred doneness!

Allow your steaks to rest for 5 minutes and then enjoy!  And sprinkle some of the garnish if you desire!