Showing posts with label The Pioneer Woman. Show all posts

Wednesday, June 27, 2012

Pioneer Womans Cinnamon Rolls

I have a favorite cinnamon roll recipe.  It was one I got from a friend when I first got married and have loved it ever since.
I was in the mood to try something new and since I have practically loved every recipe from Pioneer Woman, I decided to try hers!
They were yummy and just as good as her pictures showed!  She uses a maple frosting that is fun to try every once in a while too!
So if you are in the mood for cinnamon rolls (well maybe not this week with 100 degree temps) give these a try or maybe just try her frosting with your own favorite recipe!
I also highly recommend both her cookbooks!  They are awesome!
Cinnamon Rolls
(Pioneer Woman cookbook Recipes from an Accidental Country Girl)

Dough
  • 1 quart (4 cups) whole milk (I just use what I have, but I am sure whole milk would make them a WHOLE lot yummier!!)
  • 1 cup oil
  • 1 cup sugar
  • 2 pkgs (4 1/2 tsp) active dry yeast
  • 9 cups flour (I used half wheat and half white)
  • 1 heaping tsp baking powder
  • 1 scant tsp baking soda
  • 1 tbsp salt
Filling
  • 2 cups melted butter
  • 1/4 cup ground cinnamon
  • 2 cups sugar, plus more as needed
Maple Icing
  • 2 lbs powdered sugar
  • 1/2 cup whole milk (or whatever you have on hand)
  • 6 tbsp melted butter
  • 1/4 cup strongly brewed coffee (I just used more milk here!)
  • Dash of salt
  • 1 tbsp maple flavoring or maple extract
For the dough, heat your milk, oil, and sugar.  Do over medium heat and warm it up but don't let it boil.  Set it aside and let cool to lukewarm.

Once it is lukewarm, sprinkle your yeast on top and let it sit for 1 minute or until you start seeing it working.

Now pour this mixture into your mixer and get ready to mix!  Add 8 cups of your flour and stir until combined.  Cover with a clean towel and set it aside to rise for about 1 hour.  Make sure you have a warm spot or if you are lucky enough to have a proofer on your oven, stick this pot of yumminess inside there!

Remove your towel after an hour and you should see a yummy rised dough.  Now add your baking powder, baking soda, salt and the remaining 1 cup of flour.  Mix with your dough hook again and combine.  If you need to add more flour to make it not incredibly sticky, do so!

Now the joy of this recipe is that she says you don't have to use it right away!  I haven't tried this with hers, but she says you can put the dough in the refrigerator for up to 3 days and just keep punching the dough down if it rises up over the bowl!

If you are using the dough right away (or you are ready to use it from the refrigerator), take half your dough and roll it out to a large rectangle.  You may want to flour your work surface to prevent sticking!  Now comes the yummy goodness!  I gave her measurements for butter, cinnamon and sugar.  You can use her measurements and use half for this part of the dough and half for the other part or you can wing it like I do and just sprinkle till it looks good!  The most important part is to make sure you do the melted butter first!  Make sure you try and spread evenly and don't get too close to the edges so you can roll them up and not loose too much buttery yumminess!

Begin at the long end and start rolling the dough up.  Try and keep it tight!  When you reach the end, pinch your seams together.  Now use a knife and cut your rolls into 1 1/2 inch slices.  (You can see a great step by step on her blog if I have confused you by now!)

Pour a couple tablespoons in your pan (she uses pie pans, or I like jelly roll pans or whateve you want to cook them in) and make sure the butter coats the pan.  Place your cut rolls in your pan making sure you don't overcrowd your rolls.  Repeat this until you are out of dough and then do the same with your other half of dough.

Cover your rolls with a clean towel and let rise for about 20 minutes.  During this time, preheat your oven to 375 degrees.  You can now get a head start on your dishes, or take a much needed break!

Now remove your towels and bake for 13-17 minutes or until golden brown.  Don't overly brown them, you will be sad if you do!

While they are baking, make your icing!

In a large bowl, whisk together your powdered sugar, milk, butter, coffee(or more milk), and salt.  Add your maple flavoring.  Whisk until smooth.  Taste and add more maple, sugar, or butter if you feel it needs anything else!  The icing should be thick but pourable!

While the rolls are still warm, pour your maple icing all over the top, making sure to get all the edges covered.  As they sit the rolls will absorb the icing and make them super yummy!

Wednesday, June 13, 2012

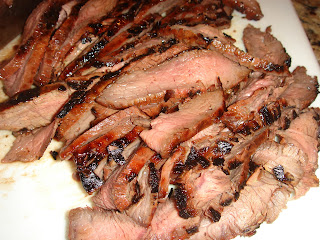
Asian Inspired Flat Iron Steak

We are carnivores at our house and nothing seems to be better than a good cooked steak!  (or one that is Todd endorsed!!)
Well I also love a meal where part of it involves cooking outside by my husband!  Nothing better than having a little help with dinner!
This steak had great flavor and was really tender!  My husband usually prefers meat flavor instead of marinade, but even he liked this a lot!
We ate it with rice and it was loved by all!
Asian Inspired Flat Iron Steak
(From Pioneer Woman Black heels to Tractor Wheels book)
  • 1/2 cup soy sauce
  • 1/2 cup sherry (or 1/4 cup vinegar, 1 tbsp sugar & then add water to make 1/2 cup of mixture for a substitute)
  • 1/4 cup honey
  • 2 tbsp sesame oil
  • 2 heaping tbsp minced ginger (or I used powder)
  • 2 tbsp (3-5 cloves) minced garlic
  • 1 tsp crushed red pepper flakes
  • 2 flat iron steaks
  • Can garnish with roasted sesame seeds and slivered green onions
Whisk all the ingredients, except steaks! :)

Place the steaks and marinade in a Ziploc bag and chill in the refrigerator for 3-6 hours.  Then grill them to your preferred doneness!

Allow your steaks to rest for 5 minutes and then enjoy!  And sprinkle some of the garnish if you desire!

Wednesday, May 16, 2012

Spicy Lemon Garlic Shrimp

This is another great find from my new Pioneer Woman cooks cookbook.  I did mess up a little and bought the wrong shrimp!  OOPS!  But all in all the recipe was good and easy and oh sooo buttery!  I think next time I might try this with half the butter and I am sure it will still be plenty.  But then again, when I buy the right shrimp, maybe it will be right!
Spicy Lemon Garlic Shrimp
(The Pioneer Woman cooks cookbook)
  • 1 cup cold butter, cut into pieces
  • 4 garlic cloves, peeled
  • 1/4 cup fresh parsley (if using dried, 1 tsp dried = 1 tbsp fresh)
  • juice of 2 lemons
  • 1 tsp salt
  • 1 tsp crushed red pepper flakes
  • 2 lbs raw shrimp, deveined, shells on
Preheat your oven to 375 degrees. 

Add your butter and garlic to a food processor.  Then add your parsley, lemon juice, salt, and red pepper flakes.  Pulse this mixture several times until everything is mixed together.

Arrange your shrimp on a baking tray in a single layer.

Dot the top of each shrimp with your butter mixture. (The cookbook has great pictures and step by step pictures throughout!  Love it!!)

Roast the shrimp in your oven until the shrimp are cooked through and the butter is bubbly, about 20 minutes.  Serve in a large bowl making sure to keep the juices and drizzle all over the shrimp.

She recommends serving with crusty french bread so you can dip your bread in the yummy buttery juices!  We ate ours with some yummy flank steak, french bread and baked potatoes!  It was super yummy!

Monday, May 14, 2012

Pioneer Woman Tres Leches Cake

I made this cake way before Cinco de Mayo, but as said in previous posts, I have been a slacker and haven't wanted to get on the computer!  So here it is many days after, but still a really good cake to try any time!
It was moist, and easy to make!  I dont' know if I would have thought to make this except I bought Pioneer Woman's new cookbook and was wanting to make something from it!  Cake it was!
It is definitely a yummy (and no chocolate) recipe and it was really simple to make!
Try it today!  I dare you!  You wont be disappointed!
Tres Leches Cake
(The Pioneer Woman Cooks cookbook)
  • 1 cup flour
  • 1 1/2 tsp baking powder
  • 1/4 tsp salt
  • 5 large eggs, separated
  • 1 cup plus 3 tbsp sugar
  • 1/3 cup milk (she says whole milk, but I used 1% that I had on hand)
  • 1 tsp vanilla extract
  • 1 12 ounce can sweetened condensed milk
  • 1 14 ounce can evaporated milk (I think I found I had a 14 ounce can sweetened condensed and 1 12 ounce evaporated and it was fine)
  • 1 pint plus 1/4 cup heavy cream
  • Maraschino cherries for garnish if wanted!
Preheat oven to 350 degrees.  Grease and flour your 9 x 13 pan.  Really follow this because I didn't and was unable to get mine out of the pan! 

Combine the flour, baking powder, and salt in a large bowl.  Set aside.

Add the egg yolks and 3/4 cup of the sugar to a mixing bowl.  Beat them until very light in color.  Then add your 1/3 cup milk and vanilla.  Beat until just combined.

Pour this over your flour  mixture and stir gently until combined with a rubber spatula.

In a clean mixing bowl, beat your egg whites on high speed until soft peaks form.  Add 1/4 cup sugar and then continue beating until the whites are stiff but not dry.

Gently fold your egg whites into the bowl with the other ingredients.  Don't over mix!  Again Don't Over mix!!  Stop just short of it all being completely mixed in!

Spread the batter in your baking pan and bake the cake for 35-45 minutes or until a toothpick comes out clean.  Remove the cake and let it cool completely in the pan.  It will be spongy looking!

When the cake is cool, invert it on a platter.  This is where I ran into problems.  If you can't get it out, then just do the next steps in the cake pan.  It worked fine for me!

Poke holes in your cake all over with a fork.  Combine your sweetened condensed milk, evaporated milk, and 1/4 cup heavy cream.  Slowly pour this all over your cake!  Make sure to get it all over the edges and evenly coat the surfaces!  Some of the liquid will pool all around the cake too!

Allow cake to sit for 30 minutes to soak up all that milky goodness.  Then whip your 1 pint heavy cream with the remaining 3 tbsp sugar until thick.  Spread this all over your cake!  YUM!!!

Cut into squares and be prepared for people to ask what is that?? and promptly want the recipe!

Wednesday, April 4, 2012

Twice-Baked New Potatoes

I ordered, or pre-ordered the new Pioneer Woman cookbook for my sister for her birthday!  Well actually I ordered one for myself too!
I really like the pioneer woman's blog and her cookbooks have been great too!
Potatoes are an easy add to a meal, but sometimes I get tired of the same old baked or mashed potato.  So I tried this and it was a success!  I wont say it is good for you, but it is very yummy.  Another bonus is that you can make them in the morning when you have more time and then do the final bake right before dinner!
It takes a little extra work, but it was worth it in the end.  The recipe made more than my family could eat, but the leftovers were really good once again for lunch!
Twice-Baked New Potatoes
(The Pioneer Woman Cooks Food from my Frontier cookbook)
  • 12 new potatoes, scrubbed clean (I used regular russets, about 6-7)
  • 2 tbsp olive oil
  • 4 ounces cream cheese, softened (I used the neufachtal and room temp)
  • 1/2 cup sour cream
  • 1 1/2 cups Monterey Jack cheese, grated (I used Colby jack)
  • 1 tbsp minced chives (optional if you don't have any)
  • 1 garlic clove, finely minced
  • salt and pepper to taste

Preheat oven to 375 degrees. 

 Place your potatoes on a cookie sheet and drizzle with the olive oil.  Toss them around to coat, or rub them with your hands.  Roast your potatoes.  If you are using new potatoes, about 20-25 minutes is recommended or until they are tender and skins are crisp.  If using russets, bake for about 60 minutes or until tender and skins are crisp.

Now you need to halve your potatoes.  I waited a little to let them cool down.  Use a spoon and scoop out the insides of your halves.  Leave a little bit on the edges to keep your skin in tact and keep its shape.

Put your scooped out potato in a bowl and add your sour cream, cream cheese, jack cheese, chives, and salt and pepper.  Mash with a potato masher until mixture is smooth and taste it see if needs more seasonings.

Scoop your mixture into your potato skin shells.  You can now cover and refrigerate if you want to make these in advance before dinner.

If you are eating now, bake for 20-25 minutes or until golden brown on top!  Enjoy with steak, chicken or whatever you fancy!

Thursday, February 16, 2012

Corn and Cheese Chowder

This soup was a hit at our house!  One of my favorite food blogs is the Pioneer Woman and she now has a food show on the food network.  She made this soup this last Saturday and it was super simple and very very good!
Soups are a wonderful meal in the winter!
Todd thought we should have had a sandwich or something else with it, but I thought it was great all by itself!  It depends on your feelings for meat in every meal or not!
This is definitely a keeper and one I will make often~just add a sandwich or maybe some potatoes to the soup would make it a little heartier!
Corn and Cheese Chowder
(Pioneer Woman via Food Network)
  • 4 tbsp butter
  • 1 whole onion, chopped (I used 1/2 onion)
  • 3 slices bacon, cut into pieces (I used 4 to add a little more bacon)
  • 3 whole bell peppers, finely diced ~ red, yellow, orange
  • 5 ears corn, kernels sliced off (or 1 pkg frozen white corn thawed, which is what I used)
  • 1/4 cup flour
  • 3 cups chicken stock or broth
  • 2 cups half-and-half
  • 1 heaping cup of Monterey Jack cheese
  • 1 heaping cup of Pepper Jack cheese
  • 1/3 cup sliced green onions
  • salt and pepper
  • Bread bowls if you want to serve in them or crusty bread to dip and eat with it
I pre chopped all my vegies before I started and had my cheese grated.  It seemed to make it simpler for me especially as you might be helping kids with homework etc.

In a large pot, melt butter.  Over medium-high heat, add your chopped onions and cook for a few minutes.  Add your bacon (I find it easy to cut my bacon as I put it in the pot with kitchen scissors) and cook for another minute or so.  As the onions and bacon are cooking, I periodically stirred the mixture.  Now add your chopped bell peppers and stir occasionally cooking for a few minutes.  Finally, add your corn and cook again for a few minutes.

Sprinkle the flour evenly over your mixture and stir to combine.  Pour in the chicken stock and stir well.  Allow this to thicken for 3-4 minutes, and then reduce heat to low.  Stir in your half-and-half and then cover and simmer for about 15 minutes or so. 

Stir in cheeses and green onions.  When the cheese is melted and the soup is hot, check your seasonings and add salt and pepper if needed. 

Serve in bread bowls, or in bowls with bread to eat with it.  My kids dipped their bread in the soup and also ate with saltines.  You can also eat this with a sandwich also!

Wednesday, July 27, 2011

Rhubarb Cobbler

I found this recipe on The Pioneer Woman and decided I just might need a rhubarb plant after all!  This was a great summer dessert and had great flavor!  It was easy to make and yummy with vanilla ice cream or whipped cream!  I do think next time I will chop up my rhubarb in bigger chunks and also not use all the dough.  I had lots of dough and piled it on, but it ended up not getting all the way done on the bottom of the layer!  I also might add more rhubarb next time too!  Definitely a keeper and a summer treat!!

Rhubarb Cobbler
(The Pioneer Woman)
  • 4 cups chopped rhubarb (or maybe more!!)
  • 1 1/2 cups sugar
  • 1/4 tsp salt
  • 2 tbsp lemon juice
  • 1/2 tsp almond extract (optional, but I added this)
  • 2 cups flour
  • 2 tbsp sugar
  • 1/4 tsp salt
  • 1 tbsp baking powder
  • 1/4 cup shortening (Crisco)
  • 1/4 cup butter
  • 1/2 cup whole milk (I used what I had on hand~1%)
  • 1 egg
Preheat oven to 400 degrees.

In a bowl, combine chopped rhubarb, sugar, 1/4 tsp salt, lemon juice, and almond extract.  Stir and set aside.

In a separate bowl, combine flour, 2 tbsp sugar, 1/4 tsp salt, and baking powder.  Stir together and then add the shortening and butter.  Cut together with a pastry cutter or you could use a fork also.

Beat egg and milk together.  Pour into flour mixture and stir together with a fork until combined.

Pour rhubarb into a greased baking dish (I used a pie plate).  Make sure to get all the juices out of the bowl!  Tear off pinches of the dough and drop it onto the surface of the fruit, creating a cobbler texture.  Sprinkle additional sugar over the top.  Bake for 30-35 minutes or until golden brown and bubbly.

Serve warm with ice cream or whipped cream!  It is also good cold the next day!!

Thursday, July 7, 2011

French Toast

I found this recipe on Pioneer Woman and decided to give it a try!  (She makes hers with a berry butter, which I may try later!)  It is just french toast, but she does it a little different.  She only used egg yolks.  She said on her blog you haven't lived if you haven't tried it this way!  I decided to try it when she described the yucky blobs you can get on french toast when the whites on the egg don't get mixed in.  You know when it makes cooked egg on the sides of your french toast or when you have a blob of it on the bread!  I absolutely hate that! 
So this was the recipe for me to try!  It was good, no blobs of yucky egg white and had great flavor.  She cooks with half and half, but I think you could get away with just using milk!!
Try it both ways for breakfast or as we did for our Breakfast Wednesday Dinner!
French Toast
(The Pioneer Woman)
  • 1 loaf of sourdough french bread
  • 4 whole egg yolks (just the yolks!!!)
  • 2 cups half and half
  • 1 tbsp sugar
  • 2 tsps vanilla
  • zest of one lemon (which I didn't add!)
  • Sifted powdered sugar for on top
  • Syrup!
Cut your bread into 1/2 inch thick slices or buy the already pre cut bread.  In a dish combine the egg yolks, half and half, sugar, vanilla, and lemon zest if you are adding.  Whisk to combine.  Dip bread slices in mixture, coating both sides and cook on a griddle or skillet over medium heat.  Brown both sides and remove to a plate.

Sprinkle with powdered sugar and pour yummy maple syrup on top!  ENJOY!!

Wednesday, April 27, 2011

Jaden's Chinese Beef Broccoli

I found this on the Pioneer Woman site. Yes I look on there oh too often, but I find some really good recipes that my family has really loved!

She found this in a new cookbook called The Steamy Kitchen. She raves about it, but I haven't seen it before. I did look on Amazon and got a sneak peek. She has all sorts of info on Chinese spices, marinades, etc. that was really good info to read. Maybe it might be worth it??

This was a really good, quick meal that my family all enjoyed. The flavors were good and it is always nice when your main course includes your veggie!

Chinese Beef Broccoli
(The Steamy Kitchen Cookbook)
1 lb top sirloin or flank steak, thinly sliced into 1/8 in. thick strips (I used a London Broil)

1 1/2 lbs broccoli, cut into bite sized florets (I used about 3 stalks)

1 tbsp cooking oil

1 tbsp minced garlic (I like garlic and didn't measure this. I used 5-6 cloves)

BEEF MARINADE

1 1/2 tsp soy sauce
1 tsp corn starch
1/2 tsp cooking oil
black pepper to season beef
(I doubled this marinade)

STIR-FRY SAUCE
3 tbsp oyster sauce
2 tsp Chinese rice wine or dry sherry ~ (I substituted apple juice here)
2 tsp Chinese black vinegar or balsamic vinegar


DIRECTIONS
In a bowl, combine the ingredients for Beef Marinade. Add the beef and let marinate for 10 minutes at room temp. (I actually marinated mine for 1 hour in the refrigerator)

In a small bowl, mix together the ingredients for the Stir-Fry sauce.

In a wok or large saute pan, bring to a boil about 1 inch of water. Add the broccoli and cover. Steam for about 3 minutes or until you can pierce the stem with a fork. Your broccoli should still be crisp, tender and bright green.

When broccoli is done, drain and let sit. Dry the pan and set it over high heat. When hot add 1 tbsp cooking oil and swirl to coat the pan. Add your minced garlic and fry for about 15-30 seconds. The garlic should be fragrant when done. This happens quick, so have your meat ready to add.
Add the steak strips, keeping them in one layer and fry for about 30 seconds and then flip over for another 30 seconds.

Pour in the stir fry sauce and stir to combine. Simmer until the sauce is thick-which happens pretty fast. Add your broccoli and toss to coat.

Eat with rice and enjoy!

Friday, April 15, 2011

Simple Sesame Noodles

We like the restaurant Hu Hot! I think the flavors they use in there sauces and all the vegies you can add to your noodles!

We are trying to do a little Hu Hot at our house!

I found this recipe and decided here was a beginning. You don't cook it up on a skillet, but I think next time I will add vegies to the sauce and cook them up on a skillet with some meat!

The flavors are good and I loved the easiness of this!

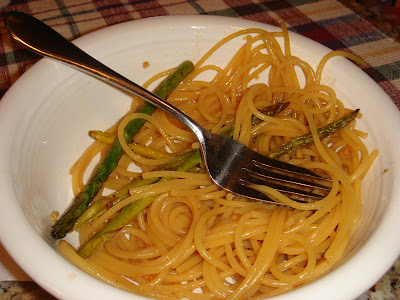
Zach even added some of the Garlic-Balsamic Asparagus to his noodles! Simple Sesame Noodles (www.thepioneerwoman.com)


  • 12 ounces thin noodles, cooked and drained


  • 1/4 cup soy sauce


  • 2 tbsp sugar


  • 4 cloves garlic, minced


  • 2 tbsp rice vinegar


  • 3 tbsp pure sesame oil


  • 1/2 tsp hot chili oil ( I couldn't find this exact name, but used Mongolian Fire Oil from Blairs) ~ don't be nervous was NOT too spicy!


  • 4 tbsp canola oil


  • 2 tbsp hot water


  • 4 whole green onions, sliced thin (forgot to buy these!)

Whisk all the ingredients (except noodles and green onions) together in a bowl. Cook some yummy vegies in some of the sauce if desired!


Pour sauce over warm noodles and toss to coat.


Sprinkle with green onions and serve it up!

Thursday, April 7, 2011

Spicy Dr. Pepper Shredded Pork

Here is the picture finally!

Yummy!!

I have a picture of this wonderful yummy scrumptious pork, but my computer is being temperamental and wont let me download it!

I couldn't wait any longer to share, so you get it without picture (but go to http://www.thepioneerwoman.com/ and you can find her picture!).

It is only shredded pork and we have all seen shredded pork, but I have not had pork like this before!

It is tender and yummy and has a slight spice from the Chipotle peppers, which I have discovered that I truly love these peppers!!

My kids ate this fine, it was a little spicy for them, but oh so good! I ate the rest of the left overs today for lunch! In fact I thought about eating lunch at about 10 I wanted to eat this pork! So try it out and hopefully it isn't too spicy for your family!

________________________

Spicy Dr. Pepper Shredded Pork

(The Pioneer Woman)


  • 1 whole large onion


  • 1 whole pork shoulder (pork butt) roast - 5-7 lbs.


  • salt and pepper


  • 1 can (11 ounce) Chipotle peppers in Adobo sauce


  • 2 cans Dr. Pepper (I bought a bottle, like the ones at the convenience store! It was a little less than 2 cans, but I didn't want to buy a case)


  • 2 tbsp brown sugar

Preheat oven to 300 degrees.


Peel and cut the onion into wedges. Lay them in the bottom of a large dutch oven or roasting pan. I sprayed my pan with non-stick spray and clean up was a breeze!


Generously salt and pepper your roast. Set it on top of your onions. Pour the can of Chipotle peppers and the sauce all over the top of the roast. Pour in the Dr. Pepper. Add the brown sugar and mix with the juice. (I put a little Dr. Pepper in a cup and mixed in the brown sugar and then poured in the pan.)


Place lid on pot and set in oven. Cook for at least 6 hours, turning the roast over 2-3 times during cooking. Check meat after 6 hours; it should be falling apart. If not falling apart, return to oven for another hour.


Remove meat from pot when done and shred. Discard any fat. Strain off as much fat from the liquid in your pan and then place the shredded meat back in the pan. Keep warm until ready to serve. I was concerned about it being too spicy, so I put my shredded meat in another oven proof dish and poured some liquid into the dish to cover.


Serve on warm flour or corn tortillas with lettuce, cheese, sour cream, tomatoes, avocado, etc. Also good as nachos with tortilla chips! Mixing the meat with the lettuce, cheese, etc. helps the spiciness too!

Tuesday, April 5, 2011

Sweet Cinnamon Scones

This is yet another one of Pioneer Woman's yummy recipes!

They are light and cinnamony~light not on the terms of calories, but on the terms of yummy soft texture and full of cinnamon chips and sweetness!

They take a little time putting together~just the part where you form the dough and make the actual scone. It was sticky (next time I will flour my counter) and then I think I crammed too many on the cookie sheet and I will use 2 sheets next time! I had a really hard time getting them out of the pan without breaking them!

Definitely a great brunch or holiday make, not (at least for me) an everyday make!

I will definitely not shy away from making scones again though! So good!!

Sweet Cinnamon Scones

(The Pioneer Woman)


  • 3 cups flour


  • 1/3 cups sugar


  • 5 tsp baking powder


  • 1/2 tsp cinnamon


  • 2 sticks (1 cup) butter


  • 3/4 cups heavy cream


  • 1 egg


  • 1 tsp vanilla extract


  • 1 cup cinnamon chips

Topping:


  • 1/2 cups sugar


  • 1 tsp cinnamon


  • 1 1/2 tsp heavy cream

Preheat oven to 350 degrees.


In a large bowl, mix flour, 1/3 cup sugar, 1/2 tsp cinnamon, and baking powder. Cut butter into pieces and then cut the butter into the dry ingredients (use a pastry blender or fork to incorporate the butter until it resembles coarse crumbs).


Stir in cinnamon chips.


Mix together in a separate bowl cream, egg and vanilla extract. Pour into flour/butter mixture, stirring gently with a fork to combine.


Turn onto a work surface~mixture will be crumbly and sticky at the same time. Gently press together on the sides as you flatten or can roll with a rolling pin. From either a circle or rectangle.


Mix together topping ingredients and sprinkle over dough. Cut into wedges or triangles and transfer to a cookie sheet (or 2) and bake for 20-25 minutes.


Allow to cool before serving!

Monday, March 14, 2011

Basic Drip Beef

This beef sandwich had great flavor and was very easy!
You cook it in a heavy pot instead of a crock pot. I don't know why you couldn't put it in a crock pot if you don't like the idea of putting it on your stove all day.
My house smelled like dinner all day, but at least dinner was pretty much done in the morning!
Basic Drip Beef
(Pioneer Woman)
  • 2.5-4 lb chuck roast
  • 1/4 cup butter
  • 1 large onion, sliced thick
  • 3 cloves garlic, peeled
  • 1/2 cup soy sauce
  • 1 cup sherry (substitute 2 tbsp vinegar + chicken stock to equal 1 cup)
  • 1/2 tsp salt
  • 4 cups water
  • Toasted, buttered rolls
  • Cheese, optional

Heat butter in a heavy pot over med-high heat. Saute the onions for a couple minutes, or until starting to brown.

Set roast on top of the onions. Add all remaining ingredients and cover pot. Simmer on very low heat on the stove for 6 hours, or until beef is fork tender or you can shred easily.

Shred meat with 2 forks until all large chunks are gone. Serve immediately or you can continue to simmer for 30 min. to 1 hour.

Serve with your rolls or you can also toast under the broiler and melt cheese!

Monday, March 7, 2011

Creamy Chicken Spaghetti Casserole

I really liked how this recipe turned out! I changed it a little, because I didn't add the mushrooms, due to children who would turn there little noses up if they even spied those!
This was a yummy recipe that wasn't as heavy as the other chicken spaghetti recipe posted. I thought this was lighter feeling and just as good!
Next time I make this I am going to add other veggies~zucchini would be good, squash, broccoli, or any of your favorite veggies you like with pasta!~
Creamy Chicken Spaghetti Casserole
(the pioneer woman)
  • 1 whole cut up fryer chicken~I used a couple chicken breasts that I cooked in a saute pan with salt and pepper
  • 1 stick (1/2 cup) butter
  • 16 ounces mushrooms~or another veggie of your choosing!
  • 1/4 cups dry white wine~I substituted chicken broth
  • salt and pepper
  • 1/4 cups flour
  • 2 cups chicken broth~I ended up needing way more broth than this, so have more on hand
  • 1 1/2 cups whole milk
  • 1/4 cups (additional) dry white wine~again substituted chicken broth
  • 1 cup Parmesan cheese
  • 1 cup chopped black olives
  • 1 tsp salt, or to taste
  • black pepper
  • extra cheese for sprinkling
  • 1 lb thin spaghetti

Cook your chicken. If using a whole chicken~place in a pot of water and boil on med-low heat for 30-40 minutes. Remove chicken from pot and allow to cool slightly and keep broth in pot.

Melt 2 tbsp butter in a large skillet. Throw in mushrooms (or other veggie), add 1/4 cup dry white wine (or substituted chicken broth), and sprinkle with salt and pepper. Cook over medium heat for 8-10 minutes, or until liquid has totally evaporated. Remove mushrooms from skillet (or other veggies) and set aside.

Bring broth to a boil. This broth you are using to cook your thin spaghetti. You need enough to cover your pasta and cook. Break spaghetti into thirds (shorted pieces). Add spaghetti pieces to boiling broth and cook. Drain when al dente.

While spaghetti is cooking, shred your chicken. You need about 2 plus cups of chicken.

Return large skillet (the one for the mushrooms) to med-low heat. Add 6 tbsp butter. Sprinkle flour over butter, whisking to combine. Cook for 1-2 minutes.

Pour in 2 cups of broth and whisk to combine. Pour in milk, additional 1/4 cups dry white wine (or chicken broth0, salt and pepper to taste. Cook and bubble until thick.

Turn off heat, add Parmesan cheese and stir.

Add mushrooms (or other veggies), chicken, chopped olives. Stir to combine and check seasonings. Add cooked spaghetti and stir.

Turn into a 9 x 13 pan. Bake at 350 degrees for about 15 minutes or golden brown and bubbly.

Enjoy!

Tuesday, February 15, 2011

Beef Fajita Nachos

Doesn't that just look Scrumptious!
2 words described this meal ~ YUM and YUMMY!
The marinade for the flank steak was super good and great flavor. You do have to prepare in advance, since the flank steak marinates for 24 hours! It is definitely worth it! This steak would be great for fajitas in a tortilla too! We served ours with refried beans also!
Make sure you do the peppers and onions, they were yum!
Beef Fajita Nachos
(The pioneer Woman blog)
Flank Steak Marinade:
  • 1 flank steak
  • 1/3 cup olive oil
  • 2 whole limes juiced
  • 4 whole canned chipotle peppers (1 can), with a little sauce
  • 4 cloves garlic, peeled
  • 1 whole handful cilantro (which I omitted since I have a cilantro hater at my house!)

To prepare the steak, combine the olive oil, lime juice, garlic, chipotle peppers (just add a little sauce from the can too), and cilantro in a food processor or blender. Blend until totally combined.

Place flank steak and marinade in a large plastic bag or dish. Make sure to coat the meat. Seal bag or cover dish tightly and refrigerate for 24 hours at least!

NACHOS INGREDIENTS:

  • 2 whole peppers, cleaned and sliced (I used a yellow and orange one)
  • 2 whole yellow onions (I used 1 onion)
  • olive oil ~ for frying
  • tortilla chips
  • Grated cheese ~ I blended cheddar and monteray jack
  • guacamole ~ we sliced avocados on top instead
  • salsa
  • sour cream
  • refried beans
  • I also made my Black Bean dip

When ready to make nachos, preheat oven to 350 degrees. Drizzle olive oil on your grill. Cook the meat on an outdoor or indoor grill over very high heat, about 4 minutes per side! Remove the steak from grill and set aside to rest.

In a large skillet, heat a couple tbsp olive oil over med-high heat. Add onions and peppers and cook for 3-5 minutes, or until somewhat soft and start blackening. (You should also be heating your refried beans at this point!) Remove from heat when done.

Slice your meat into strips. Then cut them again into smaller bite size pieces. You can cut your peppers and onions into smaller pieces at this point too!

Arrange tortilla chips on a cookie sheet. Generously place cheese on top of your chips. (I didn't place enough cheese the first time and ended up adding more on top after they had cooked, so make sure to add lots of cheese!) Place cookie sheet in the oven and cook for 3 minutes or so, or until cheese is melted.

Remove from oven and place your meat and peppers/onions on top. Then you can scoop what you want on your plate and add whatever toppings you desire!

Repeat with remaining meat and vegies, or save for another day!

ENJOY!! They are really really good!

Monday, February 14, 2011

Mushroom and Swiss Sliders with Spicy Fry Sauce

This is yet another Pioneer Woman recipe that turned out yummy!
It was a new way to make a hamburger, and the fry sauce was really good!
You don't have to make these small, but they were perfect for my boys and actually good portion control if you are trying to eat less!
Mushroom and Swiss Sliders with Spicy Fry Sauce
(The Pioneer Woman)
Fry Sauce:
  • 1/3 cups mayonnaise
  • 2 tbsp ketchup
  • 1 tsp cayenne pepper (I used 1/2 tsp and found it spicy enough for me!)

In a small bowl, mix mayo, ketchup, and cayenne. Stir together until totally combined. Set aside.

Ingredients: Mushrooms and Onions

  • 4 tbsp butter
  • 1/2 whole onion, finely diced
  • 8 ounces mushrooms, chopped finely (next time I am going to not chop the onions and mushrooms finely and just leave them sliced. I think that will be just as good!)
  • 4 dashes Worcestershire sauce
  • salt and pepper

Melt butter in a large skillet. Add onions and cook over medium heat for 5 minutes, stirring frequently. Add mushrooms and toss around. Add Worcestershire, salt and pepper. Cook for several minutes over medium heat, or until all the liquid is evaporated. Transfer mushroom mixture to a separate bowl, scraping all contents from the skillet.

Ingredients: Hamburgers

  • 2 lbs ground beef
  • 4 tbsp heavy whipping cream
  • 4 dashes Worcestershire sauce
  • 1 tsp salt
  • pepper
  • Swiss Cheese
  • Dinner rolls for sliders, or hamburger buns if making bigger

Mix ground beef, heavy cream, Worcestershire, and salt and pepper in a bowl. Use your hands to thoroughly mix ingredients.

Form 1/4 - 1/3 cup of the meat mixture into patties. Make an indentation with your thumb to keep the patties from plumping too much when they cook. In the same skillet as you cooked the mushrooms, melt 1 tbsp butter over medium to med-high heat.

Add 4 patties at a time, indented side face up. Cook for 4 minutes, then flip. Spoon generous portions of the mushroom mixture on each patty. Then top with cheese. Place lid on pan and cook for an additional 2-3 minutes or until burgers are cooked through and cheese melted. Remove and keep warm and cook remaining meat.

Toast halved buns under the oven broiler. Spread generously with fry sauce. Place patties between buns and serve!

Thursday, February 3, 2011

Banana Bread

I found this recipe on the Pioneer Woman Blog. I wanted to find another bread recipe for when I don't have cream cheese (which by far is a really really good recipe!)!!
This recipe was really good, I really wanted to drizzle chocolate sauce over the top of it, but I refrained. Or even add chocolate chips to it, but I again refrained!
Next time I might add some cinnamon to it, but overall it was easy and moist! I do think next time I wont put as much in the bundt cake pan and cook some in a smaller loaf pan. My bread was really tall! I liked that this was in a bundt pan. It makes it kind of fancier if you need something to take someone, maybe with chocolate drizzlied on top!!!
I had a friend tell me that they like to toast their banana bread in the toaster the next day and put butter on it! I tried this and it was super good and a new way to eat it for me!
Banana Bread
(The Pioneer Woman Blog)
  • 2 sticks butter (I did 1 stick butter, 1 stick margarine)
  • 1 1/2 cups + 2 tbsp sugar
  • 3 eggs
  • 1 1/2 cups mashed ripe bananas
  • 4 cups + 2 tbsp flour
  • 1 tsp baking soda
  • 1 1/2 tsp baking powder
  • 1 1/2 cups sour cream

Preheat oven to 350 degrees. Grease and flour bundt pan (I normally just spray the pan, but I did flour this time because I often times have difficulty getting these breads out in one piece).

Cream butter and sugar together. Add eggs, one at a time, beating for a few seconds after each addition. Add mashed bananas and beat.

Combine dry ingredients in a separate bowl.

Add dry ingredients and sour cream alternately to the mixing bowl. Beat well until combined. Pour into bundt pan and bake for 1 hour 10 minutes or until toothpick inserted comes out clean (Mine took the whole time!).

Invert on a cooling rack and allow cake to cool before slicing and serving with softened butter.

Tuesday, January 18, 2011

Huevos Hyancinth

On Breakfast Wednesday last week we had the yummiest egg ever! I usually pass on the eggs, I like them but they are not my favorite! I would have to say yes to this egg!
YUM YUM YUM!
I didn't make them for my kids, wasn't sure how they would react. They like eggs, but they also like things to look the way they should. Todd and I had these and they were super good and super fast and easy! Definitely something you could throw together in about 10 minutes, which would just about include your cooking time too!
Huevos Hyancinth
(The Pionees Woman Cookbook)
  • Butter for ramekins
  • Thinly slice ham, turkey, or any deli meat (I used Ham)
  • Tomato slices or salsa
  • Large Eggs
  • Salt and Pepper to taste
  • Crumbled or grated Monterey Jack or any cheese you like

Butter individual ramekins, and in each one place a piece of ham. Top the ham with the tomato slices or with salsa or picante sauce (a couple tbsp will do). Gently crack an egg ove the top of each ramekin. Sprinkle with salt and pepper.

Top each ramekin with 1/4 cup grated cheese or crumbled cheese.

Broil for 2-4 minutes, removing when the yellow of the egg is still soft but not overly runny. It took me about 7-10 minutes to cook mine. I wanted to make sure the whites were done!

Tuesday, January 11, 2011

Creamy Mashed Potatoes

If you are going to eat mashed potatoes, you should definitely eat them like this! This is definitely not going to fill any New Years resolutions, but like I said if you're going to eat mashed potatoes....

These were soooo yummy, smooth, creamy and my husband didn't once ask where the gravy was (although he may have given up on that question since I usually don't make gravy!!!) or need anything else! These were of course found in my Pioneer Woman cookbook, which I love-have I said that before??
Creamy Mashed Potaoes
(The Pioneer Woman)
  • 5 lbs Russet or Yukon Gold Potatoes (I just cut up what I thought my family would eat)
  • 3/4 cups butter
  • 1 pkg (8oz) cream cheese, softened (I used 1/3 less fat cream cheese and it was really good. I used 4 oz cream cheese)
  • 1/2-3/4 cup half and half
  • 1/2-1 tsp Seasoned Salt
  • 1/2-1 tsp Black Pepper

Peel and cut the potatoes into pieces that are generally the same size. (I usually cut them small so they cook faster!!) Bring a large pot of water to a simmer and then add the potatoes. (I have always put the potatoes into the pot and then boiled the water with the potatoes already in! This was new to me!) Bring to a boil and cook for 30-35 minutes.

When they're cooked through, the fork should slide through easily, with no resistance. She also said the potatoes should almost, but not totally fall apart..

Drain the potatoes in a large colander! (I got one of those over the sink colanders and I can't tell you enought about how much I love it!!!!) When the potaotes have finished draining, place them back in your dry pot, put back on the stove, and turn your heat to LOW! Mash the potatoes over low heat, allowing the steam to escape, before adding in all the other ingredients. (I had never done this either, I am sure this adds to the texture.) Once all the lumps are gone and the steam is about gone too, turn the stove off.

Add 1 1/2 sticks of butter (which I didn't add this much), cream cheese, and about 1/2 cup of half-and-half. Mash, Mash, Mash!!!

Now add the seasoned salt and black pepper. Stir well and taste to see if you need to add more. Place in a medium-sized baking dish. Throw a few pats of butter over the top of the potatoes and place them in a 350 degree oven and heat until butter is melted and potatoes are warmed through. (She recommends covering them with foil too!)

NOTE: You can make these in the morning or a few days in advance if you are preparing for a big meal! Take it out of the fridge about 2-3 hours before ready to serve and bake in a 350 degree oven for about 20-30 minutes or until warmed through. (I would probably put them in the fridge right before you would bake. Then add the pats of butter right before baking time and go!!)

Monday, January 10, 2011

Simple, Pan-Fried Pork Chops

I went to Costco and found that they had their pork chops on sale in the coupon book. I couldn't resist a good deal and bought some and then went searching the Internet to find a new way to cook pork chops! Well guess what???
Of course Pioneer Woman had a great recipe on her site! They were juicy, flavorful, easy and down right good! So go to Costco and get some of those pork chops (which I cut each pork chop in half width wise because they are sooo thick!! Twice as many pork chops now!) and enjoy them a new way!
Simple, Pan-Fried Pork Chops
(The Pioneer Woman)
  • 7 or 8 breakfast chops, very thin Bone-in pork chops (I used the Costco ones cut in half)
  • 1 cup flour
  • 1 tsp seasoned salt (she recommended Lawrys, is there a difference in brands??)
  • 1 tsp black pepper
  • Cayenne Pepper, to taste (I just sprinkled some on all over the flour)
  • 1/2 cup oil
  • 1 tbsp butter
  • Extra Salt and Pepper, to Taste

Rinse pork chops (she rinses, I didn't do that! Maybe I should???). Mix flour, seasoned salt, black pepper, and cayenne pepper together in a dish. Salt and pepper both sides of your chops. I salt and peppered one side and then placed that side down in the flour mixture. Then I salt and peppered the other side when it was in the flour. After you have dredged each side in the flour mixture, place on a plate.

Heat oil over medium-medium/high heat. Add butter (I forgot this part!!). She said on her blog that this adds flavor and crustiness to the pork chop! When butter is melted and butter/oil mixture is hot, cook 3 pork chops at a time until no pink juices remain!

Remove to a plate and cook remaining pork chops.

Delicious and simple and serve with mashed potatoes (which I will share an AWESOME recipe for some tomorrow!!!)