Showing posts with label Cookies. Show all posts

Friday, May 18, 2012

Best ever Oatmeal Chocolate Chip (or Raisin) Cookies

Well these cookies have lived up to the title!  My family has absolutely loved them!  We have a disagreement going though about which is better ~ raisin or chocolate chip!!  We are even thinking to try craisin or craisin chocolate chip???
These cookies are soft and flavorful and really are a great oatmeal cookie!
Best ever oatmeal chocolate chip cookie
(found on a blog that I forgot to write down! OOPS!)
  • 1 cup butter or margarine softened
  • 3/4 cup brown sugar
  • 3/4 cup sugar
  • 2 eggs
  • 1 tsp vanilla
  • 2 cups flour
  • 1 tsp baking soda
  • 1 tsp salt
  • 2 tsp cinnamon
  • 3 cups quick oats (or I did 2 cups regular oats)
  • 2 cups chocolate chips (or divide your dough and do 1 cup raisins and 1 cup chocolate chips)
OK, the original recipe says that these taste better mixed by hand!  I looked away at these directions and used my mixer!  So you decide. but the thought of mixing all this by hand wasn't happening!  Just remember, we thought they were super good mixed in the mixer!

Mix your butter and sugars together.

Add in eggs, vanilla, baking soda, salt, and cinnamon.

Stir in your flour, then oats.  This is where I did do a little hand mixing.  I divided my dough in half and hand mixed in my raisins in one side and chocolate chips in the other half.  (If you find your raisins are hard, just soak them in warm water while you get the cookie dough made and it should soften them up!)

Bake at 375 degrees for 8-10 minutes.  They are done when they start turning golden brown in color.

Great on there own, with a glass of milk, or I really wanted to make an ice-cream sandwich with them!  YUM all 3 ways!

Friday, May 11, 2012

Thick and Chewy Chocolate Chip Cookies

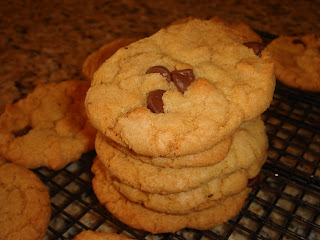
It doesn't seem like I am ever satisfied with the chocolate chip cookie recipe I have!  I do have a few of them and the ones in my recipe book have all been winners!  But for some reason I keep trying new ones and looking for new ones!  I don't know why, maybe I will figure it out one day!
These cookies were definitely thick and chewy and good!
They were yummy dunked in milk and would have made great ice cream sandwich cookies for summer time!
Thick and Chewy Chocolate Chip Cookies
  • 2 cups plus 2 tbsp flour
  • 1/2 tsp baking soda
  • 1/2 tsp salt
  • 1 1/2 sticks butter, melted and cooled until warm
  • 1 cup packed brown sugar
  • 1/2 cup sugar
  • 1 egg plus 1 egg yolk
  • 2 tsp vanilla extract
  • 1-1 1/2 cups semisweet chocolate chips
Preheat oven to 325 degrees.  Line 2 large baking sheets with parchment paper or spray with cooking spray.  I lined mine with parchment paper.

Whisk your flour, baking soda, and salt together.  Set aside.

Cream your butter and sugars together until thoroughly blended.  Beat in your egg, egg yolk, and vanilla until combined.  Add your dry ingredients and beat until combined.  Stir in your chips or mix on low.  Add 1 cup and see if it is enough for you before you do 1 1/2 cups.

OK~This is where you gives you a new way to make cookies!  I tried it and thought the cookies were cool looking, but definitely not a have too!

Roll about 1/4 cup dough in your hand and make a ball.  Now hold your ball between 2 fingertips and tear it in half.  Rotate the halves 90 degrees until the jagged edges are facing up and then squish the balls together at the base to form one ball.  Place the formed balls with the jagged edges up on your baking sheets.  This will give them a cool edgy appearance.

Bake until cookies are golden brown and outer edges start to harden and middles still soft and puffy ~ about 15-18 minutes.  Cool the cookies on the sheets and then remove to your cooling racks!

Thursday, May 10, 2012

Peanut Butter-Oatmeal Chocolate Chip Cookies

OK I have taken a slight hiatus from posting new recipes.  This is not due to lack of trying new things, but lack of desire to sit at the computer!  See my computer in the kitchen died last fall and I have had to use the archaic old lap top that was bought ages ago and wasn't being used!  It is a pain to use and periodically just turns off!  I guess it is a good timer to monitor your Internet or computer use!!
Well, I made these cookies in April!  They were so yummy and definitely on my make often list, especially since I just bought the big jumbo jars of peanut butter at Costco!
The cookies are soft and the combination of peanut butter and chocolate are always a good combo in my book!  The other bonus in my eyes is that they make about 16-20 cookies!  Just enough to eat and not too many leftovers for my house!  My true love is a hot cookie out of the oven!!
Peanut Butter-Oatmeal Chocolate Chip Cookies

  • 1 cup flour
  • 1 tsp baking soda
  • 1/4 tsp salt
  • 1 stick or 1/2 cup butter at room temp
  • 1/2 cup creamy peanut butter
  • 1/2 cup sugar
  • 1/3 cup light brown sugar
  • 1/2 tsp vanilla
  • 1 egg
  • 1/2 cup oats
  • 3/4-1 cup chocolate chips
Preheat oven to 350 degrees.  Line 2 baking sheets with parchment paper and set aside!  (If you have an Allison's pantry dealer near you, you totally need to get there parchment paper sheets.  They come in sheets to fit your cookie sheets exactly!  I love it!  No curling sheets, cutting to size, etc!  Totally worth every penny!

Whisk together the flour, baking soda and salt and set aside.  (I don't often set aside my dry ingredients, probably because I am too lazy!  So do if you like, she recommended it but I think I just added the dry ingredients a little at a time!)

Cream together the butter, peanut butter, sugar, brown sugar,and vanilla extract.  Do this for about 3 minutes.  Add the egg and beat to combine.  On low speed, gradually add your whisked dry ingredients (or add them a little at a time like I do!  Live dangerous!!).  Add your oats, and then chocolate chips.  The original recipe called for 1 cup, but I thought it was too many chocolate chips, so I adjusted my recipe for next time to 3/4 cup.  I would recommended to start with 3/4 and see what you think!

Use a large cookie scoop and drop your dough onto your prepared parchment lined baking sheets.  Place about 2 inches apart at least and bake for 10 minutes or until lightly golden.  Cool completely on your baking sheets and then store in an air tight container!

Enjoy some peanut butter chocolate goodness and no you are getting your oats as well!

Wednesday, March 28, 2012

Rainbow Pinwheel Cookies

I found these on pinterest!  They are Dr. Seus inspired cookies!
My kids had a great time helping me make them!
They turned out really fun and the best part is I didn't have to frost them and the kids got to help!
This would also be a fun way to make theme cookies.  For example, you could mix your favorite sports teams colors together and swirl them!
Rainbow Pinwheel Cookies
  • 1 recipe your favorite sugar cookie dough (mine is the sour cream sugar cookies on this site!)
  • Liquid food coloring, 5 colors
  • Rainbow sprinkles, or I used colored sugar sprinkles
Preheat oven to recipes temperature.

Make your dough.  Divide your dough into 5 equal parts or as many colors as you want to do.  Color each part the color you want.  We used purple, red, yellow, green and blue.  The original poster said neon colors work really well, I will try that next time!

I mixed my colors in with my mixer.  I didn't clean it in between, so some of the colors got mixed up, but it worked fine.

Now, chill your dough as needed.  Make sure it is good and chilled so that it wont get too sticky as you work with it!

This is where my kids came in and helped!  Now you need to form your different colors into grape size balls.  I noticed that it didn't really matter the size, just that bigger balls made bigger cookies and bigger portions of one color than another just made that color more prominent than the others.

So make your different color balls.  When you have 1 of each color, combine them into a ball, like a multi color beach ball.  Now roll the ball into a snake and then coil together.

Roll your edges into the sprinkles if desired and cook for the time recommended on your cookie recipe!

Super good and super fun cookies!

Monday, March 19, 2012

Chocolate Mint Oreo Cookies

These were a yummy St. Patricks day treat!
I was kind of a dud this year with St. Patricks Day!  Usually we have all sorts of great green food, including last year making a really cool rainbow jello!
This year, we took the kids Cross Country Skiing and totally bagged the whole green thing except for the cookies! 
Its a good thing the cookies were really yummy and a hit with the kids and adults alike!
Minty goodness with Mint Oreos crushed up inside each one!
YUM!
Chocolate Mint Oreo Cookies
(pinterest via www.twopeasandtheir)pod.com
  • 2 1/2 cups flour (start with 2 cups)
  • 1 tsp baking soda
  • 1/4 tsp salt
  • 3/4 cup cocoa powder
  • 1 cup butter, room temp
  • 1 cup sugar
  • 1 cup brown sugar
  • 2 eggs
  • 2 tsp vanilla extract
  • 1 cup semi-sweet chocolate chips (try 1/2 cup first)
  • 1 1/2 cups mint green chips (try 1 cup first)
  • 1 cup chopped Cool Mint Oreo Cookies
Preheat oven to 350 degrees.  Line a baking sheet with parchment paper and set aside.

In a medium bowl, sift(I didn't sift, just put together and whisked) flour (start with 2 cups first), baking soda, salt, and cocoa.  Set aside.

In your mixer, cream your butter and sugars until smooth!  Add in your eggs one at a time.  Next add your vanilla.

Slowly add your flour mixture to the sugar and butter mixture.  Mix together until all the flour disappears.  If mixture is too sticky, add the remainder of the flour.  Stir in chocolate chips, mint chips and chopped oreo cookies.

Use a cookie scoop and place on your parchment sheets.  Bake for 10 minutes or until cookies set on edges and soft in the middle.

Let them sit on baking sheet for 3-5 minutes and then transfer to cooling rack.

Thursday, March 15, 2012

Double Chocolate Peanut Butter Cookies

My Grandmother had cookies at her house probably every time we came to visit!  She had 2 varieties and they were my our families favorites!
One was a chocolate with peanut butter chips in it!  YUM!  Just thinking about them makes me want to make them!  But then I would eat them all and be in big trouble!
Well, this is a similar cookie, but you put peanut butter in it instead of the chips!  YUMMO again!!  I actually put in half peanut butter chips and half chocolate chips so it was a double chocolate double peanut butter cookie with my changes and yes they were YUMMY!
Double Chocolate Peanut Butter Cookies
  • 1 1/2 cups flour
  • 1/2 cup cocoa
  • 3/4 tsp baking soda
  • 1/2 tsp salt
  • 1/2 cup butter, softened
  • 1 1/2 cups sugar
  • 1/2 cup peanut butter
  • 2 eggs
  • 1 tsp vanilla
  • 1 1/2 cups semi-sweet chocolate chips (I did 3/4 cup chocolate chips and 3/4 cup peanut butter chips)
Preheat oven to 350 degrees.

In a small bowl, whisk together your dry ingredients~flour, cocoa, soda, and salt.  Set aside.

In your mixer, cream your butter and sugar.  Then add your peanut butter and beat until light and fluffy.  Add your eggs and vanilla and mix until combined.

Stir in your chocolate chips (or mixture of peanut butter and chocolate chips).

Use your cookie scoop and place on your baking sheets and bake for about 10 minutes.  Cookies will still be soft and will set up after cooling.  Place on a wire rack and let cool, or if you are like me, eat them while they are really warm and gooey!

Friday, February 17, 2012

No-Bake Cookies made into Shapes

I am pretty sure this is not an original idea, but I needed to make a treat and thought why not make no-bakes in a cookie cutter mold??
Well it worked out better than I expected!  The only thing you need to worry about is working fast.  By the time I got to my last group, the cookies were starting to set up!
A fun way to make cookies into shape and an easy way when you need something quick!  Here is the recipe I used, which is actually already posted on the blog.  It is a good recipe if you haven't tried it!

No-Bake Chocolate Peanut Butter Cookies


Jamie Cooks it up!

4 cups sugar

6 tbsp cocoa

1 cup butter

1 cup milk

1 tsp salt

2 tsp vanilla

1 cup crunchy peanut butter (I only had creamy and used that)

6 cups quick oats (add 7 cups if using regular oats) ~ substituted 1 1/2 cups 6 grain mix for 1 1/2 cups of the oats.  Good extra way to get more grains!

Put the sugar, cocoa, butter, milk, and salt in a large saucepan. Over medium high heat, bring it to a boil, stirring occasionally. When it comes to a boil, start stirring constantly for 3 minutes.

Remove from heat and add your vanilla, peanut butter and oats. Stir in around until it is all incorporated. (I added the vanilla and peanut butter and then stirred until the peanut butter was melted. Then I poured this on top of the oats in a bigger bowl and stirred it all together.) It might be a little thin at first, but it will set up!

Drop by large spoonfuls into your cookie cutter onto wax paper. When you have the desired amount in your cutter, carefully remove the cutter and you shoud have your shape!  Work kind of fast so the cookie mix doesn't set up too fast in your bowl.  If you don't have wax paper, just spray cooking spray on cooking sheets and that will work too! Let the cookies cool and set up for about 20 minutes, then you are ready to eat!!

Tuesday, February 14, 2012

Swirled or Tie-Dyed Sugar Cookies

I started out with a different plan on making sugar cookies.  I ended up with this design!  I divided my sugar cookie dough and colored half of it.  Then I kind of kneaded it together and mixed it up!
The fun part about doing this is that you can change the color up for any occassion ~ blue and white for BYU fans, green and white for St. Patricks day, etc.
I liked how it turned out~kind of proud of myself for making something fun and new!  Ben is bringing these to school today for his class Valentine treat and I sent some with Todd to work so I wouldn't sit at home eating them!  Something about sugar cookies that are sooo yummy!
You can use your favorite sugar cookie recipe, or I have added the one I used that to me never fails and is super soft and yummy!
HAPPY VALENTINES DAY!

Sour Cream Sugar Cookies

1 1/4 cups sugar

3/4 cup softened butter

2 large eggs

1/4 cup sour cream

1 1 /2 tsp vanilla

3 1/4 cups flour

1/2 tsp baking soda

1/4 tsp salt

Beat butter and sugar till light and fluffy. Beat in eggs, sour cream, and vanilla. Gradually beat in dry ingredients. Refrigerate over night or as long as you can (at least an hour or so!).

Roll and cut out with cookie cutters! Bake 350 degrees for 8-10 minutes!

Wednesday, February 8, 2012

Chocolate Heart Cut-out Cookies

I made these cookies at Halloween.  They were skeletons!
The cookies were so yummy that I figured who wouldn't love chocolate hearts too!  These cookies are soo yummy that they don't even need frosting~at least according to me!
I do think that it would be a fun Valentine treat to turn them into chocolate heart ice cream sandwiches though!  I thought next time I make these to put ice cream in the middle and then roll the ice cream in sprinkles too!

Chocolate Cut-Out Cookies


2 1/2 cups flour

1/2 cup cocoa powder

1 cup (2 sticks) butter

1 cup sugar

1 egg

1 tsp vanilla

Preheat oven to 350 degrees. Line your baking sheets with parchment paper or use a baking mat if you have one!
Cream butter and sugar together until light and fluffy (1-2 minutes). Beat in egg and vanilla until combined.
Slowly add your dry ingredients to the butter mixture. Add your cocoa powder first and then slowly incorporate the flour. I used all 2 1/2 cups. Scrape the sides of your bowl as you go.
Lightly dust your surface with flour or cocoa powder and roll your dough out. It recommends to roll your dough and then place in the refrigerator for 15 minutes. I didn't put mine in the fridge. My dough wasn't sticky and I was able to work with it right away!
Cut out shapes and place on your baking sheets. Bake 8-10 minutes or until set. Don't over bake! Just make sure edges look set!
Let your cookies cool on your baking sheet for 2-3 minutes and then place on a cooling rack!
Now you can eat them warm, cool them and then frost, or cool them and make an ice-cream sandwich!

Thursday, January 26, 2012

Cherry (or Raspberry) Chocolate Chunk and Marshmallow Cookies

Wow that title was a mouth full!!
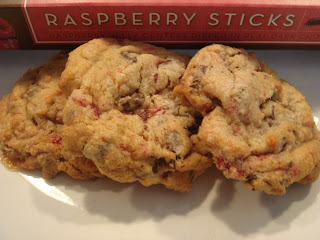
I found this recipe on Picky Palate!  She originally used Cherry Sticks, but I was given Raspberry sticks at Christmas.  I thought, why not give this a try!  Picky Palate always has great recipes and I was up for the experiment.
The experiment was successful and they turned out really good!  I don't think I would go out and buy these sticks on purpose to make them all the time, but the raspberry and chocolate was really yummy together!

Cherry (or Raspberry) Chocolate Chunk and Marshmallow Cookies
  • 1 cup softened butter
  • 3/4 cup sugar
  • 3/4 cup packed brown sugar
  • 2 eggs
  • 1 tbsp vanilla extract
  • 3 cups flour
  • 1 tsp baking soda
  • 3/4 tsp salt
  • 30-40 cherry, raspberry sticks, chopped (one pkg)
  • 2 cups chocolate chunks or chips
  • 80 mini marshmallows
Preheat oven to 350 degrees.  Line a baking sheet with parchment paper or a silpat liner.

Place butter and sugars in your mixer and mix until light and fluffy, about 2 minutes.  Add eggs and vanilla, beating until well combined.

Slowly add your dry ingredients and mix well.  Add your chopped sticks, chocolate chunks and marshmallows.  Mix just until combined.

Place on your cookie sheet using a medium cookie scoop about 1 inch apart.  Bake for 9-12 minutes, or until lightly browned. 

As soon as the cookies come out of your oven, use a plastic knife to push the melted marshmallow back onto your cookie.  Let cool for 10 minutes and then place on your cooling rack!

Enjoy!

Friday, January 6, 2012

Thumbprint Cookies

Yes again another fun find on Pinterest.  I kind of ran with the idea and thought this is not only fun for Christmas, but you could modify it for any holiday.  Just red sprinkles for Valentines with a chocolate Hershey kiss, green for St. Patty's day and so forth!  You could probably even make these into little nests for Easter and put the little chocolate eggs in the middle!  We enjoyed these for Christmas with candy cane Hershey kisses in the center!
Thumbprint cookies
(modified from Better Homes red and white cookbook)
  • 2/3 cup butter or margarine
  • 1/2 cup sugar
  • 2 egg yolks
  • 1 tsp vanilla
  • 1 1/2 cups flour
  • sprinkles of your choosing
  • Hershey kisses of your choosing
In your mixer, beat your butter or margarine on high speed for about 30 seconds.  Basically you want all the chunks gone!  Then add your sugar and beat until combined, scraping the sides as needed.  Beat in egg yolks and vanilla.

Add you flour and combine.  The recipe says to chill for 1 hour, but I usually test the dough and if I can handle it I start right away, if not put in the refrigerator for 10-20 minutes and test it again.

Shape dough into 1 inch balls.  Roll your dough in your sprinkles.  Then place on your cookie sheets about 1 inch apart.  Continue doing this until you have filled your cookie sheet.  Now take your thumb and make an indent into your cookies.  Basically you are putting your thumb print into your cookie ball and flattening it a little.

Bake at 375 degrees for 10-12 minutes or until edges are lightly browning.  While your cookies are cooking, start unwrapping your Hershey kisses.  Once they come out of the oven, start placing the kisses in your thumb print.  Once all the kisses are in your cookies, place them on a cooling rack and let them cool.  If you don't let cool, your Hershey kisses will get smooshed because they get melty from the heat of your cookie!

Enjoy these yummy treats for any holiday!

Tuesday, December 13, 2011

Brown Sugar Cookies

I found this in my Food Network magazine.  It is a Crisco recipe and it was easy and turned out really yummy.  You can dip them in chocolate or just eat them plain.  If you dip, some ideas were to sprinkle crushed candy canes, chopped nuts, sprinkles or whatever you think is fun!
Brown Sugar Cookies
(Crisco)
  • 1/2 cup shortening
  • 1/2 cup butter
  • 1 1/4 cups packed brown sugar
  • 1 egg
  • 1 tsp vanilla
  • 2 cups flour
  • 1/2 tsp baking soda
  • 1/4 tsp salt
Preheat oven to 350 degrees.

Beat together shortening, butter, brown sugar, egg and vanilla in medium bowl until light and fluffy.  I mixed the butter and shortening first and then added the remaining ingredients.  Next time I might used butter and margarine instead!

Mix in flour, baking soda and salt.  Shape dough into 1-inch balls or use a small cookie scoop.  Place 2 inches apart on a cookie sheet.

Bake 12-14 minutes or until golden brown.  Remove to cooling rack and when cooled dip or spread melted chocolate on half and sprinkle on anything you might like!

Sunday, October 30, 2011

Chocolate Cut-Out Cookies

This was a fun idea I found on the Our Best Bites site!
You use a gingerbread man cookie cutter and then decorate them into skeletons.  It is an alternative to traditional sugar cookies, especially at Halloween!  We made the skeletons, bats and spiders!  Super spooky fun!!  (and good cookies too!)
Chocolate Cut-Out Cookies
  • 2 1/2 cups flour
  • 1/2 cup cocoa powder
  • 1 cup (2 sticks) butter
  • 1 cup sugar
  • 1 egg
  • 1 tsp vanilla
Preheat oven to 350 degrees.  Line your baking sheets with parchment paper or use a baking mat if you have one!

Cream butter and sugar together until light and fluffy (1-2 minutes).  Beat in egg and vanilla until combined.

Slowly add your dry ingredients to the butter mixture.  Add your cocoa powder first and then slowly incorporate the flour.  I used all 2 1/2 cups.  Scrape the sides of your bowl as you go.

Lightly dust your surface with flour or cocoa powder and roll your dough out.  It recommends to roll your dough and then place in the refrigerator for 15 minutes.  I didn't put mine in the fridge.  My dough wasn't sticky and I was able to work with it right away!

Cut out shapes and place on your baking sheets.  Bake 8-10 minutes or until set.  Don't over bake!  Just make sure edges look set!

Let your cookies cool on your baking sheet for 2-3 minutes and then place on a cooling rack!

Decorate and enjoy your spooky cookies!

Friday, October 28, 2011

White Chocolate Pumpkin Spice Cookies

It is definitely pumpkin season and time to get all those pumpkin recipes out!  I have found a few keepers and have loved the smell these recipes make when they are baking! 
I found this recipe on Tasty Kitchen and had to try the combination with white chocolate.  This recipe also adds pumpkin spice, which I don't think I have added to my cookies before!  They had great flavor and were really moist!  To me anything with chocolate is great!  These are probably good with semi-sweet chocolate too!
White Chocolate Pumpkin Spice Cookies
  • 2 1/4 cups flour
  • 1 tsp baking powder
  • 1 tsp baking soda
  • 1 tsp ground cinnamon
  • 2 tsps pumpkin pie spice
  • 1/2 tsp salt
  • 1/2 cup butter, softened
  • 1 cup sugar
  • 1/2 cup brown sugar
  • 1 cup pumpkin puree
  • 1 egg
  • 1 tsp vanilla
  • 1 1/2 cups white chocolate chips
Preheat oven to 350 degrees.

In a mixer, cream butter with sugars.  Add your pumpkin, egg, and vanilla.  Combine thoroughly. 

Slowly add your dry ingredients.  They recommended putting all your dry ingredients in a separate bowl and whisking together.  I always just add the spices first and then the flour a little at a time.

Stir in the chocolate chips.  Drop by small cookie scoop or spoonfuls on parchment lined baking sheets. (I did use parchment, not sure if you have to or not, but nice clean up!!)

Bake for 10-12 minutes.  Cool for a couple minutes before transferring to wire racks to cool!

Tuesday, October 25, 2011

Candy Corn Sugar Cookies

I found this recipe on www.ourbestbites.com.  They have a great site and a great cookbook~you should check both out!
These were fun to make and the kids loved that they were bite size.  I do think next time I will make them bigger!
This is a fun Halloween treat and an easy way to have sugar cookies without all the cookie cutters and frosting too!
 Candy Corn Sugar Cookies
(our best bites)
  • 1 batch of your favorite cookie dough (I used the sour cream sugar cookies that is on this site! It is my favorite!!)
  • yellow and orange food coloring
Optional:
  • Sanding sugar, coarse raw sugar, or sprinkles ~ almond bark or white chocolate, melted (I didn't do this for sheer simpleness~would like sanding sugar though!)
Divide prepared sugar cookie dough into 3 equal parts.  Leave one as is and then color one part orange and one part yellow.  I used my mixer and mixed the colors in that way.  It was pretty simple.

Line a standard loaf pan with plastic wrap.  Gently press the dough into the bottom of the pan.  Start with the uncolored dough and press into the bottom of the pan.  You don't have to fill the pan, just keep it about 1/2-3/4 inch tall or larger if desired. (This is where I messed up!  I pressed mine flatter, which made my cookies bite size!  This is still a fun cookie, but I had wished for the bigger size!)

Layer the orange dough on top and smooth and flatten.  Finally layer the yellow dough on top.  Wrap plastic over the top and refrigerate for at least 1-2 hours or put in freezer for 30-60 minutes.

Remove plastic wrap and slice loaf into 1/4 inch thick slices.
Cut each slice into triangle shapes and dip tops (white part) into sugar if desired.  Bake according to your sugar cookie recipe.  Cool completely and if desired dip in white chocolate and decorate with sprinkles!

Tuesday, October 11, 2011

Ice Cream Chocolate Chip Cookie

I can't remember the blog or site I found this recipe on, but they were super yummy and very creamy!  Weird to say creamy with a cookie, but they were just that! 
A fun additive to your chocolate cookie that makes them a little different and a lot yummy!
Ice Cream Chocolate Chip Cookie
(???)
  • 2 sticks softened butter
  • 1 cup sugar
  • 3/4 cup packed brown sugar
  • 2 eggs
  • 1 1/2 tbsp vanilla
  • Heaping 1/2 cup vanilla ice cream (frozen from container)
  • 4 cups flour (I used about 3 1/2 cups)
  • 1 1/2 tsp baking soda
  • 1 tsp salt
  • 1 bag chocolate chips (I used about 1 1/2 cups)
Preheat oven to 350 degrees. 

Cream butter and sugars until fluffy.  Add in eggs and vanilla until well combined.  Add in ice cream until combined.

Add the dry ingredients to the wet mixture.  Add chocolate chips and mix until just combined.

Using a cookie scoop, place the dough on parchment lined baking sheet.  Bake for 9-11 minutes or until cookies are cooked through.  Let cool for 5 minutes on baking sheet before putting on a cooling rack.

Enjoy!

Wednesday, June 8, 2011

Oatmeal Chocolate Chip Cookies

I found this recipe last week when I had some left over oatmeal from canning a 25 lb bag.  I was in the mood for oatmeal cookies and decided to search the blogging world to find a new recipe.  I think this has become my new favorite oatmeal cookie.  The cookie was moist and chewy, not crunchy and hard like sometimes happens.  I am now replacing my last recipe with this one!
Oatmeal Chocolate Chip Cookies

  • 1 cup butter, at room temp. (I used 1/2 cup margarine and 1/2 cup butter)
  • 1 cup sugar
  • 1 cup brown sugar
  • 2 eggs
  • 2 tbsp milk
  • 2 tsp vanilla extract
  • 2 cups flour
  • 1 tsp baking soda
  • 1 tsp baking powder
  • 1 tsp salt
  • 2 1/2 cup oats
  • 2 cups chocolate chips (I used about 1 1/2 cups)
Preheat oven to 350 degrees.  Line your baking sheets with parchment paper.  I did this and it was very easy clean up.  I am not sure why this is needed.

In a large bowl, cream together the butter and the sugars until mixture is light in color.  Beat in the eggs 1 at a time.  Then add the milk and vanilla.

In another bowl stir together the flour, baking soda, baking powder and salt.  Gradually beat in the flour mixture to your butter mixture.  (I hardly ever put all the dry ingredients together.  I usually add the baking soda, powder and salt first and then add the flour a little at a time)

Stir in the oats and chocolate chips on slow speed or the recipe recommended by hand.  Refrigerate for 30 minutes before cooking for a puffier cookie.

Drop balls of dough on prepared cookie sheets, placing about 1 1/2 inches apart so they have room to spread.  Bake for 10-13 minutes, until golden brown at the edges and light golden at the center.

Cool on baking sheet for at least 1-2 minutes before transferring to a wire rack to cool.

Thursday, March 10, 2011

Sugar Cookies

I have a favorite sugar cookie recipe~it is on this site, the Sour Cream Sugar Cookies! I still really love those, but these will take a close 2nd to those! Also, if you don't have sour cream, these are a wonderful alternative. If you are dipping your cookies in yummy chocolate, these cookies would be a better pick. They hold there shape better and are not as soft all over.
These cookies are soft in the center and have a slightly firmer edge. They aren't hard by any means, just yummy!
I found this in the Our Best Bites new cookbook, which I have post-it notes all over of recipes I want to try! The cookbook is proving to be great! I have already enjoyed the recipes on their site and I am super excited to try the ones in the cookbook!
She gave a baking tip on the side to always when baking, spoon your flour into your measuring cup. It will prevent a dry cookie dough!
BRILLIANT!
Especially important with this dough!
Sugar Cookies
(Our Best Bites cookbook)
  • 1 cup real butter (no substitutions)
  • 1 cup sugar
  • 1 egg, extra large
  • 1 1/2 tsp almond extract (or use vanilla)
  • 3 cups flour (make sure to spoon scoop into your measuring cup, or do 2 1/2 cups and see if you need more flour!)
  • 1 1/2 tsp baking powder
  • 1/2 tsp salt

Cream butter and sugar until light and fluffy, about 2 minutes. Add in egg and the extract and mix well.

In a separate bowl, combine the dry ingredients and whisk together. Slowly add the dry ingredients to the butter mixture. (If you are worried about a too dry dough, only add 2 1/2 cups and then you can always add more flour if needed! That's my tip!)

Chill the dough for about 30 minutes in the refrigerator, or 15 minutes in the freezer.

Cut the cookies into desired shapes and bake at 350 degrees.

For soft cookies~8-10 minutes, or until set.

For lightly crisp cookies~10-13 minutes or edges are lightly golden brown

Allow to cool on pans for 5 minutes and then transfer to cooling racks! Let cookies cool completely before you frost them!

This is the Frosting I used:

Sugar Cookie Frosting

3 cups powdered sugar

1/3 cup butter

1-2 tbsp milk

1 tsp vanilla

Combine above ingredients and mix thoroughly.

I always cream the butter first and then add about 1/2 the powdered sugar, vanilla, and milk. Then add remaining sugar slowly and watch for desired consistency and taste you want! Don't forget the finger taste test!! Or your children love this part, so get them to help taste too!

Tuesday, March 8, 2011

White Chocolate-Peanut Butter Chip Oatmeal Cookies

I haven't made these in a while and I don't know why since they are a really good cookie! They are moist and filled with oatmeal~which for some reason makes me feel healthier!
I substituted part of the white chocolate chips with peanut butter chips and really like this combination!
White Chocolate Chip Oatmeal Cookies
(allrecipes.com)
  • 1 cup butter (I used 1/2 cup butter, 1/2 cup margarine)
  • 1 cup brown sugar
  • 1 cup sugar
  • 2 eggs
  • 2 tsps vanilla
  • 3 cups flour
  • 1 tsp baking powder
  • 1 tsp baking soda
  • 1 tsp salt
  • 1 1/2 cups oats
  • 1 cup white chocolate chips
  • 1 cup peanut butter chips

Cream butter and sugars together. Add eggs and vanilla. Add the flour, baking powder, baking soda and salt. Mix together. Add the oatmeal and white chocolate chips and peanut butter chips.

Place on cookie sheets and bake at 350 for 10-12 minutes!

Monday, January 31, 2011

Peanut Butter & White Chocolate Chip Cookies

One of my favorite cookies as a child were chocolate and peanut butter chip cookies. My Grandmother would always have these at her house when we visited. It is a cookie that brings many memories of going to my grandparents house!
I found this recipe the other day, which is very similar but has white chocolate chips too! This cookie is equally delicious! It has a very similar texture and the white chocolate chips are a good addition!
Peanut Butter & White Chocolate Chip Cookies
(Our Best Bites cookbook)
  • 1/2 cup butter-flavored shortening
  • 1/2 cup butter, softened
  • 1 cup brown sugar, packed
  • 1 cup sugar
  • 2 eggs
  • 1 1/2 tsp vanilla
  • 1 tsp baking powder
  • 1 tsp baking soda
  • 1/2 tsp salt
  • 2 1/2 cups flour
  • 6 tbsp cocoa powder
  • 1 cup peanut butter chips
  • 1 cup white chocolate chips

Preheat oven to 350

Cream together softened butter, shortening, brown sugar and sugar for 1-2 minutes until light and fluffy. Add the eggs and vanilla.

Meanwhile combine all the dry ingredients. Add to the butter mixture and mix until combined. Mix in peanut butter chips and white chocolate chips.

Use a cookie scoop and drop on ungreased cookie sheet. Bake for 8-10 minutes (mine took almost 9 minutes). The centers should be set, but the cookies are still soft. Make sure not to overbake.

Remove from oven and allow to cool for 1-2 minutes and then transfer to cooling rack!