Friday, February 26, 2010

Granola/Low-fat Granola

Our ward just recently did a honey order, so we also included in our activity night some granola recipes using honey. Edie brought these and they sound very good!
_________________________________________
Granola
  • 14 cups oatmeal
  • 2 cups coconut
  • 2 cups wheat germ
  • 2 cups chopped nuts
  • 1 cup almonds
  • 1 tsp salt
  • 1 cup honey
  • 1 cup water
  • 1 cup oil (safflower oil)

Mix and spread out in deep pan. Toast in 200 degree oven for 1 1/2 hours. Stir occasionally. Cool. Add 2 cups raisins.

Low-Fat Granola

  • 8 cups oatmeal
  • 1 cup wheat germ
  • 1/2 cup almonds
  • 1/2 cup coconut
  • 1 1/2 cups brown sugar
  • 1 tsp vanilla
  • 1/3 cup oil
  • 1/2 cup water
  • 1/2 cup apple juice (concentrate)

Thaw a can of apple juice concentrate and add 1/2 cup (Do not dilute before adding). Mix all together. Bake for 60 minutes at 300 degrees. Stir occasionally. Remove sooner if you want it less crispy.

Thursday, February 25, 2010

Spiced Honey Butter

We also served honey butter with our bread activity! Who can resist honey butter and these were 2 great recipes shared!
________________________
Spiced Honey Butter
(published in Country Woman May/June 1995)
  • 1/2 cup butter, softened
  • 1/4 cup honey
  • 1 tsp grated orange peel
  • 1/2 tsp ground cinnamon

You can beat the butter until light and fluffy, add the honey; then beat just until blended. Or just mix all ingredients well, cover, then refrigerate.

Honey Butter Spread (taste of home)

  • 1/2 cup butter, softened
  • 1/2 cup honey

In a small bowl, beat the butter until light and fluffy. Add the honey; beat just until blended. Serve with bread, bagels or toast. Store in refrigerator.

Wednesday, February 24, 2010

Tips for Bread Making

Here are the tips that were shared for Bread making last night! Start with these and then move on to the Fabulous bread recipes below!!
_____________________________
  1. Instant yeast can be mixed straight in with other ingredients.
  2. Active dry yeast must be "proofed" by mixing with 1/4 of your liquid and 2 tbsp sugar for 15 minutes before making dough
  3. If your wheat dough is heavy, replace some of your wheat flour with wheat gluten (1/4 - 1/2 cup)
  4. If you like to eat hot bread, or don't eat it fast enough to need multiple loaves at once, save the dough for later. Place half of the dough into a greased bag (or greased bowl with a lid) when forming your loaves. The dough will keep in your refrigerator for a week or more. Just pull it out when you are ready, form a loaf, let rise to double and bake as usual.
  5. Adding dough enhancers like lecithin, vital wheat gluten will improve bread texture.
  6. For crustier bread, place a pan with 1/2 inch water in the bottom of your oven. Bake bread at 425 for the first 1/3 of cook time, then drop temp to that called for in the recipe for the remainder of the cook time!

Fabulous Brown Bread, Multi-Grain Bread and French Bread

We had a great activity last night and learned all about bread from Wendy! Here are a few recipes we tried that were fabulous!!!
_____________________________
Fabulous Brown Bread
  • 1 tbsp yeast
  • 3 cup hot water (really really warm)
  • 1/2 cup extra virgin olive oil (or any type of oil)
  • 1/4 cup molasses
  • 1/2 cup honey
  • 1/2 cup wheat gluten
  • 3/4 cup non-fat dried milk
  • 1 tbsp salt
  • 4 cups wheat flour
  • 3-4 cups white flour

Mix all ingredients together in a mixer. Add just enough white flour to create dough (add your wheat first and then add the white by the cup full to see how much you need), but dough will remain sticky! Let rise until doubles.

Punch down dough and put into loaf pans (makes 2-3 loaves). Let rise one hour. Bake at 350 for 40 minutes.

Multi-Grain Bread

  • 1 tbsp yeast
  • 3 cups hot water (not too hot!)
  • 1/2 cup extra virgin olive oil (or any type oil)
  • 1/4 cup molasses
  • 1/2 cup honey
  • 1/2 cup wheat gluten
  • 1 cup 9 grain mix
  • 3/4 cup non-fat dried milk
  • 1 tbsp salt
  • 4 cups wheat flour
  • 3-4 cups white flour

Mix all ingredients together in mixer. Add just enough flour to create dough, but dough will remain sticky. Let rise until doubles.

Punch down dough and put in loaf pans. Let rise one hour. Bake at 350 for 40 minutes

Kitchen Aid Mixer French Bread

  • 2 tbsp yeast
  • 3 cup hot water (not too hot)
  • 2 tbsp extra virgin olive oil (or any oil)
  • 2 tsp sugar
  • 1 tbsp salt
  • 7 1/2 cups white flour

Mix all ingredients together in mixer on high. Let rest 10 minutes. Turn on high for 10 seconds. Repeat rest and punch down a total of 5 times (50 minutes).

Divide the dough in half and roll out into a long loaf. Put on a well greased cookie sheet sprinkled with corn meal. Slash top of bread(just use a knife and cut into the bread a little) several times and let rise 20 minutes.

Beat up 1 egg white and 1 tsp water. Brush over loaves and sprinkle with sesame seeds if desired. Bake at 400 degrees for 20 minutes! Enjoy!!

Monday, February 22, 2010

Spicy Steak Fries

Look what I found while clipping coupons!!! Yes clipping coupons! I was looking in the flyer and found this recipe beside a Mrs. Dash coupon labeld HEART SMART too!!
These are definitely heart smart since they are not fried but baked and there is just a little olive oil to help the seasonings stick! I don't know why I haven't tried this before, but these were very easy and very good! With a little ketchup and you are set! I will next time not use as much of the seasoning and you can adjust the amounts to what you need!
Spicy Steak Fries
from the smartsource coupon flyer!
  • 2 large potatoes
  • 2 tbsp Mrs. Dash extra spicy seasoning blend (I had her original blend and used that, didn't try the extra spicy! Just a little salt would be great too!)
  • 2 tbsp olive oil
  • 1 clove garlic, minced

Wash and cut potatoes into wedges, DO NOT PEEL! Dry potato slices on paper towels.

In a large bowl, toss potatoes with Mrs. Dash, olive oil, and garlic.

Spray baking sheet with no-stick cooking spray and lay wedges on baking sheet. Place potatoes in preheated 425 degree oven and bake for 20 minutes. Turn the potatoes and bake another 15 minutes or until potatoes are browned and tender!

Sunday, February 21, 2010

Cinnamon Bun Pancakes

I found this recipe on Tasty Kitchen, which is a part of the Pioneer Woman site. I am always looking for great breakfast recipes for our weekly Breakfast Wednesday dinners.
We tried these and they were really good. I didn't make the Maple-Butter icing this time, but will definitely try next time!
I read nothing but rave reviews on the icing and even just putting regular old maple syrup on them!
Cinnamon Bun Pancakes
(thepioneerwoman.com/tasty-kitchen)
  • 1 1/2 cups flour
  • 3 tbsp sugar
  • 1/2 tsp salt
  • 4 tsp baking powder
  • 1 tbsp cinnamon
  • 2 eggs beaten
  • 1 cup milk
  • 2 tbsp corn syrup
  • 1/4 cups butter, melted
  • 1 tbsp vanilla

In a medium bowl, combine flour, sugar, salt, baking powder and cinnamon with a whisk. Whisk well to make sure everything is combined.

In a separate large bowl, beat together eggs, milk, corn syrup, butter and vanilla. Stir in flour mixture.

Heat a lightly oiled griddle or frying pan over medium/low heat. Pour about 1/4 cup batter onto griddle. Brown on both sides.

Serve warm with icing drizzles on top or syrup!

Maple-Butter Icing (for Pancakes)

  • 1 cup powdered sugar
  • 1/4 cups butter, melted
  • dash of salt
  • 1 tbsp maple syrup (or can use extract)
  • 1/4 cups whole milk (or more if needed)

Whisk all ingredients together until smooth, adding more milk as needed!

Saturday, February 20, 2010

Honey Butter

Where has honey butter been my whole life! I know I have had it before, but I have never made it at home! It was a restaurant treat! Now I know why!! Honey Butter is soooooo good and you end up finding yourself eating more bread just to eat the butter! You even put way more on than you would buttering a piece of toast with just butter!
I will definitely be making this again, but I will be practicing more self control and only eat it sparingly! I did half this recipe and it made quite a bit too!
Honey Butter
  • 2 cubes real butter--close to room temp., works best when slightly chilled still
  • 2/3 cup honey
  • 3/4 cup powdered sugar

(If your butter is too soft, you'll end up with a gooey mess, so she just left it out on the counter for about 20 minutes or so before beating and it turns out nice and fluffy)

Just place everything in your electric mixer bowl and beat for about 30 seconds. I actually had to beat it longer. Serve at room temp. with anything your heart desires!!!

I placed mine in the refrigerator over night and set it on the counter in the morning and it was soft and spreadable after only about 5 minutes! Super good, make some today!!!!

Thursday, February 18, 2010

Blueberry Sour Cream Muffins

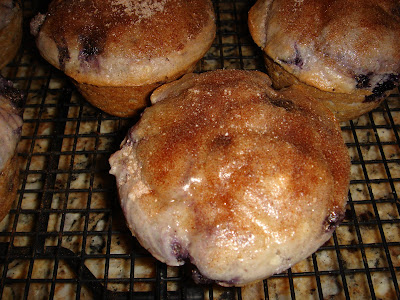
I made this muffins for our weekly breakfast for dinner, or Breakfast Wednesday as my children call it and look forward to it every week! These muffins were very moist and were loved by the whole fam!! I made a few with out the cinnamon sugar topping and Todd preferred them without. I also liked them without too, but today having one the day after I really liked the cinnamon sugar!
This is definitely a keeper and one I will make again! It was very simple, but I can't seem to make blueberry muffins without the batter turning purple!

Blueberry Sour Cream Muffins

(from http://www.theidearoom.blogspot.com/)

2 cups unbleached all-purpose flour
1 tablespoon baking powder
1/2 teaspoon salt
2 large eggs
1 cup sugar
4 tablespoons unsalted butter melted
1 1/4 cups sour cream (10 ounces)
1 1/2 cups frozen blueberries (wild)

1. Adjust oven rack to middle position and heat oven to 350 degrees. Grease muffin tin.

2. Whisk flour, baking powder, and salt in medium bowl until combined. Whisk egg in second medium bowl until well-combined and light-colored, about 20 seconds. Add sugar and whisk vigorously until thick and homogenous, about 30 seconds; add melted butter in 2 or 3 additions, whisking to combine after each addition. Add sour cream in 2 additions, whisking just to combine.

3. Add frozen berries to dry ingredients and gently toss just to combine. Add sour cream mixture and fold with rubber spatula until batter comes together and berries are evenly distributed, 25 to 30 seconds. (Small spots of flour may remain and batter will be thick. Do not overmix.)--I had a hard time mixing without my batter turning purple from the blueberries, next time I might try taking some of the flour out and mixing with the blueberries. Then mixing the sourcream mixture in the remaining flour mixture and adding the blueberries in last to see if that helps with the purple batter! All in all they probably taste the same!

4. Use ice cream scoop or large spoon to drop batter into greased muffin tin. Bake until light golden brown and insert toothpick into the center of muffin comes out clean, 25 to 30 minutes, rotating pan from front to back halfway through baking time. Invert muffins onto wire rack, stand muffins upright, and cool 5 minutes. Serve as is or with the cinnamon sugar topping below.
Cinnamon Sugar Topping:
While muffins are cooling, mix 1/2 cup sugar and 1/2 teaspoon ground cinnamon in small bowl and melt 4 tablespoons butter in small saucepan. After baked muffins have cooled 5 minutes, and working one at a time, dip top of each muffin in melted butter and then cinnamon sugar. Set muffins upright on wire rack.

Saturday, February 13, 2010

Life by Chocolate Cupcakes

I found another great recipe on The Pioneer Woman. She is awesome and I love how she talks about cooking and life! I had to try these, since I have already made these but in the form of chocolate cake and it was super yummy!

These turned out as great as she said and if you love chocolate you will love these!

Life by Chocolate Cupcakes

  • 2 cups sugar

  • 2 cups flour

  • 1/4 tsp salt

  • 1/2 cup buttermilk

  • 2 eggs

  • 1 tsp baking soda

  • 1 tsp vanilla

  • 2 sticks (1 cup) butter

  • 4 heaping tbsp cocoa powder

  • 1 cup water, boiling

  • 18 hershey kisses

Ganache

  • 8 ounces, bittersweet chocolate (I used semi sweet)

  • 1 cup heavy cream

  • 6 tbsp corn syrup

  • 2 tsp vanilla

Preheat oven to 350 degrees. Spray 18 muffin cups (or used muffin liners) with baking spray. (I got 22 cupcakes)

Combine flour, sugar, and salt. Set aside.

In a separate container, combine buttermilk, eggs, baking soda, and vanilla. Stir to combine and set aside.

In a saucepan, melt butter over medium heat. Add cocoa powder and stir to combine. Add boiling water, allow to bubble for a few seconds, then turn off heat.

Pour chocolate mixture over flour mixture. Stir a few times to cool the chocolate. Pour the buttermilk mixture over the top and stir to combine.

Pour 1/4 cup cake batter into each muffin cup. Lightly set one kiss in the middle of each cupcake; do not press down.

Bake for 20 minutes. Allow to cool for 5 minutes in the pan, then remove cupcakes and allow to cool on a baking rack.

To make the Ganache, heat cream and corn syrup over medium heat. Chop chocolate and add to a bowl. Add vanilla to cream mixture, then pour cream mixture over the top of the chopped chocolate. Whisk together until melted, smooth, and glossy. Dunk cupcakes in ganache. Allow to cool and set before serving.

Friday, February 12, 2010

Cupids Cups

I actually found this recipe last year and never got the chance to make it! So this year I went for it and I thought they turned out quite fun! I will say it was a little bit of a pain piping the chocolate. I finally just used a toothpick and drew the chocolate hearts on! Next time I might just omit the hearts!
It is a fun Valentine treat that is not chocolate but looks great! You could do this for any holiday, just change your jello color!
Cupids Cups
(www.kraftfoods.com)


What You Need!
  • 1 square BAKER'S Semi-Sweet Chocolate, melted
  • 2 cups boiling water, divided
  • 2 pkg. (3 oz. each) JELL-O Strawberry Flavor Gelatin (I did one batch with Raspberry too!)
  • 1-1/2 cups cold water, divided
  • ice cubes
  • 1 cup thawed COOL WHIP Whipped Topping
  • Decorations: assorted Valentine sprinkles and candies

Make It!


DRAW heart design or write Valentine's Day message in each of 8 (6-oz.) clear plastic cups by piping chocolate onto insides of cups. Refrigerate until chocolate is firm.

ADD 1 cup boiling water to 1 pkg. gelatin mix in medium bowl; stir 2 min. until completely dissolved. Stir in 1 cup cold water; pour into cups. Refrigerate 1 hour or until gelatin is firm.

MEANWHILE, add remaining boiling water to remaining gelatin mix; stir 2 min. until completely dissolved. Add enough ice to remaining cold water to measure 1 cup. Add to gelatin; stir until thickened. Stir in COOL WHIP; spoon over gelatin layer in cups. Refrigerate 3 hours or until firm. Decorate as desired. I added a dollop of cool whip on top of each cup too!


Kraft Kitchens TipsHow to Melt Chocolate
Microwave chocolate in microwaveable bowl on HIGH 1 min., stirring after 30 sec. (The square will retain its shape.) Stir until chocolate is completely melted.

Thursday, February 11, 2010

Candy Cane Heart Suckers

I had seen this idea on http://www.theidearoom.blogspot.com/ and thought how fun would that be to make these!
But I didn't have any mini candy canes from Christmas! So thanks to Desiree who had some and made a few of her own, I too made some fun heart suckers! They are very simple and look great! So if you don't have any candy canes, make sure to put this on your list for next year!
Save those candy canes for Valentines Day and when you are done putting your white chocolate in the middle of your hearts...

dip some pretzels in the leftovers for another fun treat!
Candy Cane Heart Suckers
www.theidearoom.blogspot.com

Simply take two (per sucker) small candy canes and place them on a greased cookie sheet in a heart shape. Slide a sucker stick in between them.


Place them in a heated 350 degree oven and watch them closely. After 3-5 minutes, they will be melty and bubbly. Quickly remove them from the oven and pinch the ends of the candy canes together at the top and bottom of each sucker. Be very careful as the candy will be HOT!
She used a knife to help mold the suckers, which I did too!


Then set the tray aside to cool. After they have cooled completely melt some white chocolate or almond bark in the microwave. Pour a small amount into the center of the suckers and smooth with your clean finger. I added a few colorful sprinkles as well. Let them cool again before packaging or better yet...Eating!

Wednesday, February 10, 2010

Spinach Mandarin Poppy Seed Salad

This recipe came from Our Best Bites and it is super yummy and easy to make! I have almost all the ingredients on hand (except the avocado) and it is a great change to the normal boring salad!
Spinach Mandarin Poppy Seed Salad
  • 8 oz (1/2 bag) of baby spinach
  • 1/2-1 head Romaine lettuce, chopped
  • (for both lettuce I just used what I had on hand)
  • 1/2 thinly sliced medium red onion
  • 1 large avocado, cubed
  • 8 oz mozzarella or swiss cheese, shredded
  • 1 12 oz pkg. bacon, cooked and crumbled
  • 1 large can mandarin oranges, drained

Combine all ingredients in a large bowl. When ready to serve, toss with desired amount of salad dressing and serve immediately. If you anticipate leftovers, just let you eaters dress their own salads!

Poppy Seed Dressing

  • 1/3 cup white vinegar
  • 1 tsp salt
  • a few turns of freshly ground black pepper (or a little of the regular stuff)
  • 3/4 cup sugar (I may use less sugar next time and taste!)
  • 1 tsp ground mustard
  • 1 green onion, chopped
  • 1/2 cup oil
  • 1 tsp poppy seeds

In a blender, combine vinegar, salt, pepper, sugar and mustard. While the blender is running, add the green onion. Continue running the blender and add the oil in a steady stream and is fully incorporated into the dressing.

Pour the dressing into a serving or storage container and whisk in poppy seeds. Serve over your leafy greens!

Sunday, February 7, 2010

Onion Strings

The Pioneer Woman has done it again (and you should check out her site, she makes cooking oh so fun, I just might order her cookbook!) These were so so so so Yummy!!
All I can say is YUMMY, YUMMY, YUMMY!
I may never make another type of onion ring again! My kids liked them(and didn't even know they were eating onions, since they are sliced so thin and oh so crunchy) and so did everyone else! All I can say is Try them and you will see too how great and Yummy these onion strings are!
Onion Strings
  • 1 whole large onion
  • 2 cups buttermilk
  • 2 cups flour
  • 1 tbsp salt
  • 1/4-1/2 tsp cayenne pepper (I stayed more on the 1/4 side)
  • 1-2 quarts canola oil (to fry them in)
  • Black Pepper to taste

Slice onion very thin. (If you have a mandolin, this slicing becomes very simple!) Place in a baking dish (I used a 9 x 13 pan) and cover with buttermilk and soak for at least an hour. Combine dry ingredients and set aside.

Heat oil to 375 degrees.

Grab a handful of onions, throw into the flour mixture, tap to shake off excess, and PLUNGE into hot oil. Fry for a few minutes and remove as soon as golden brown.

Repeat until onions are gone!

Wednesday, February 3, 2010

Restaurant Style Salsa

I found this recipe on http://www.thepioneerwoman.com/ and decided she had the right idea! She doesn't like big tomato chunks either! I don't really like tomatos, but in salsa and sauces. So I prefer the restaurant style and really really liked this one! Todd even gave this one a big thumbs up too!
I didn't have any jalapenos and my family doesn't like cilantro, so those were omitted, but it was still quite spicy and good! If you want to see a really inviting picture, take a look at her site and all her other great recipes too!
Restaurant Style Salsa
  • 1 can (28 oz) whole tomatoes with juice
  • 2 cans (10 oz) Rotel (diced tomatoes with green chilies)--here you can pick your spicy temp too by picking original, mild, or jabanero!
  • 1/4 cup chopped onion
  • 1 clove garlic, minced
  • 1 whole jalapeno, quartered and sliced thin
  • 1/4 tsp sugar
  • 1/4 tsp salt
  • 1/4 tsp cumin
  • 1/2 cup cilantro (more to taste!)
  • 1/2 whole lime juice

Combine whole tomatoes, rotel, onion, jalapeno, garlic, sugar, salt, cumin, lime juice and cilantro in a blender or food processor. Pulse until you get the salsa to the consistency you'd like--she did it about 10-15 pulses. Test seasonings with a tortilla chip and adjust as needed.

Refrigerate salsa for at least 1 hour. Serve with tortilla chips or cheese nachos!